


Home fried chicken usually fails in the same spot. The crust looks perfect coming out of the pot, deep gold and loud against the rack, and then twelve minutes later it has gone soft and damp and started sliding off the meat in sheets. The chicken underneath is cooked fine. The outside quit.
The recipe is rarely the problem. Water is. Most of it was already in the bird when you brought it home, and every step after that is either removing it or adding more.
Eric Huang, founder of Pecking House, says it plainly: “Due to the horrors of industrialized animal husbandry, mass-produced chicken encounters a disconcerting amount of water. And water is the enemy of all things crispy.” His fix costs nothing. Unwrap the chicken, set it on a plate, and leave it uncovered in the refrigerator for about one evening before you cook it.
Start The Night Before, Not The Hour Before
Supermarket chicken is usually chilled in a chlorinated 34-degree water bath after slaughter, and it drinks up a lot of that water. That extra moisture keeps skin from browning and drying as it cooks, which is why air-chilled birds crisp more readily. Air-chilled chicken says so on the label, and it usually costs a little more. If you can find it, buy it.
Whatever you buy, dry it. Pat every piece down with paper towels, then let it sit uncovered in the fridge overnight so the surface air-dries. If you are defrosting, plan backward: full thaw in the refrigerator first, then the extra evening on top of that. Set a reminder on your phone, because this is the step people mean to do and then do not.
Patting chicken dry with paper towels before it hits heat matters more than almost any other single thing you do. It is also the step with the worst effort-to-payoff ratio in your head and the best one in the pan.
The Buttermilk Soak, With One Addition
Yes, you just dried the chicken out and now you are putting it in liquid. That is the trade, and buttermilk is worth it. The acid breaks down proteins so the meat comes out tender, and it helps the coating grab on instead of sliding.
Give it time: at least two hours, and longer if you can. Huang counts ample marination time among the most important parts of marinating, and describes the buttermilk step as what gives him juicy, tender chicken.
Then do the thing almost nobody does at home. Huang stirs a small bit of flour into the marinade itself. He explains that this lets the gluten in the flour hydrate and form a lattice that improves how well the crust sticks to the meat. Two tablespoons into two cups of buttermilk is plenty. If your breading has ever peeled away in one sad shingle, this is the repair.
Cornstarch Is Doing More Work Than Your Flour
Straight all-purpose flour makes a sturdy crust and a slightly heavy one. Cornstarch makes a lighter, crisper one, because it cuts down the gluten that toughens a coating and because it dries the surface it sits against. Most serious fried chicken coatings use both, flour for structure and cornstarch for crunch, in roughly a 3:1 ratio.
That works out to about a cup and a half of flour to half a cup of cornstarch, which is the ratio in the recipe below. Push it closer to half and half and the crust gets thinner and glassier, which is great if you plan to sauce the chicken, since a starch-heavy shell resists going soggy under a glaze.
Add a tablespoon of baking powder to the dry mix too. It raises the pH of the surface, which speeds up browning, and it throws off tiny carbon dioxide bubbles that leave the coating more porous. Keep it to roughly a tablespoon per two cups of dry mix. Too much baking powder leaves a metallic taste, and you will notice.
Dredge Harder Than You Think You Should
Adam Carry, chef at Picnic Provisions & Whiskey, wants the chicken moved a lot more than most of us move it. He says to toss the chicken at least 20 to 30 times between the flour and the batter to get those nice, crispy edges and little bits. Those bits are the whole point. Flat breading fries flat.
Ian Scott of The Slogar in Crested Butte, Colorado, has the companion tip: sift the flour between dredges. A constant sift keeps clumps from forming, and clumps turn into hard lumps that scorch. Scott notes that sifting removes excess buttermilk, and that is what gives the chicken its crisp outer layer.
For maximum ridges, pile dry flour mix over a wet-battered piece and squeeze it on with your hand, then shake off the loose stuff hard. Cooks who fry constantly build their craggy coating exactly this way. Do not let the chicken loiter in the flour afterward, though. Sitting too long in the dredge turns the coating pasty before it ever sees oil. Once coated, rest the pieces on a rack 10 to 15 minutes so the flour hydrates and locks on.
Oil Temperature Decides Everything Else
Buy a thermometer if you do not own one. The window is 325 to 350 degrees. Below 300, the coating soaks up oil instead of sealing and you get grease. Above 375, the outside burns before the inside is done.
Every piece you add drops the oil temperature, which is why restaurants fry in batches and why your fourth thigh comes out worse than your first. In a home pot, two or three pieces at a time is honest. Crowding is the single most common home mistake and it is entirely self-inflicted.
Timing runs about 18 to 20 minutes for bone-in pieces and 6 to 10 minutes for boneless, but go by a thermometer, not the clock: the thickest part should read 165 degrees. Pull the chicken out an hour before frying so it is not refrigerator-cold going into the pot. If you want insurance on thick thighs and breasts, finish them in a 375-degree oven for 10 to 15 minutes, which sets the crust and cooks the center without darkening the outside further.
Paper Towels Are Where Crispy Chicken Goes To Die
Set a hot piece of fried chicken on a folded paper towel and the steam coming off the bottom has nowhere to go. It condenses, the towel goes damp, and the underside softens while you are still frying the rest. Use a wire rack over a sheet pan. Oil drips away, air moves underneath, and the crust firms up as it sits.
Let it rest a few minutes before anybody touches it. And if you want the version that stays crunchy for an hour, borrow the Korean double-fry method: after the chicken has rested and cooled slightly, drop it back into the oil for 30 seconds to a minute. The second fry drives off the last of the surface moisture and hardens the shell.
Changes Worth Making, And One Worth Skipping
Swap part of the flour for rice flour and the crust gets crisper. Cooks have also gone further afield with the coating, crusting chicken with pecan and corn flour or crushed barbecue potato chips, and the moisture rules above still hold.
For wings without a pot of oil, dry them completely, toss with baking powder and salt, and roast on a rack at 425 degrees for 40 to 45 minutes, flipping once. Air fryers and ovens get you a respectable crust, but they do not fully match deep frying, and anyone telling you otherwise has not eaten them side by side.
What you should know about the final result: Huang describes his ideal as chicken with “a crispy crust, a juicy but not greasy bite and thorough seasoning.” Season the dredge, not just the meat. Unseasoned coating tastes like paste no matter how loud it crunches.
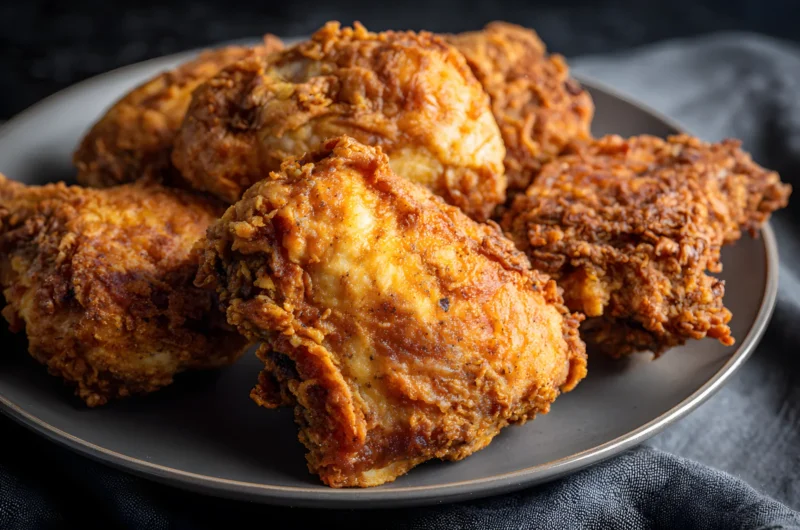
Overnight-Dried Buttermilk Fried Chicken
Course: DinnerCuisine: American4
servings35
minutes35
minutes640
kcalThe crust shatters, the meat stays juicy, and the whole trick starts the night before.
Ingredients
3 1/2 pounds bone-in, skin-on chicken pieces (thighs, drumsticks, breasts cut in half)
2 cups buttermilk, plus 1/2 cup extra for the second dip
2 tablespoons kosher salt, divided
2 teaspoons black pepper, divided
1 1/2 cups all-purpose flour, plus 2 tablespoons for the marinade
1/2 cup cornstarch
1 tablespoon baking powder
2 teaspoons paprika, 1 teaspoon garlic powder, 1 teaspoon onion powder, 1/2 teaspoon cayenne
About 6 cups peanut or canola oil, for frying
Directions
- The night before, unwrap the chicken and pat every piece completely dry with paper towels. Arrange the pieces on a rack set over a sheet pan, skin side up, and refrigerate uncovered overnight. This air-dries the surface and is the step that makes or breaks the crust.
- The next day, whisk 2 cups buttermilk with 1 tablespoon of the salt, 1 teaspoon of the pepper and the 2 tablespoons of flour until smooth. Add the chicken, turn to coat, and refrigerate at least 2 hours and up to 8. The flour in the marinade helps the crust grip the meat.
- Pull the chicken out of the fridge about an hour before you fry so it loses its chill. Meanwhile, sift the 1 1/2 cups flour, cornstarch, baking powder, remaining salt and pepper, paprika, garlic powder, onion powder and cayenne into a wide shallow bowl. Sifting keeps the mixture loose and clump-free.
- Lift one piece from the marinade, let the excess drip off, and drop it into the dry mix. Toss it 20 to 30 times, piling flour over the top and squeezing it on with your hand to build ridges. Dip it back into the extra 1/2 cup buttermilk, then return it to the flour and toss hard again.
- Shake off the loose flour vigorously and set each coated piece on a clean wire rack. Sift the dry mix again between pieces if it starts getting pasty. Let the coated chicken rest 10 to 15 minutes before it goes anywhere near the oil.
- Pour about 2 inches of oil into a heavy Dutch oven and heat it to 350 degrees, checking with a thermometer. Lower in only 2 or 3 pieces at a time. Adding more than that drops the temperature fast and gives you greasy chicken.
- Fry bone-in pieces 18 to 20 minutes, turning once, and keep the oil between 325 and 350 the whole time by adjusting the burner. Boneless pieces need only 6 to 10 minutes. Either way, the thickest part should read 165 degrees. Move finished pieces to a wire rack set over a sheet pan, never onto paper towels.
- For the crunchiest result, let the chicken sit 5 minutes, then return it to the oil for 30 seconds to 1 minute. If any thick pieces need more cooking, slide the whole rack and pan into a 375-degree oven for 10 to 15 minutes instead. Rest a few more minutes before serving.
Notes
- Air-chilled chicken, sold at many larger grocery stores and labeled as such, browns and crisps better than standard water-chilled birds because it has not absorbed extra water.
- If you plan to sauce the chicken with honey butter or a hot glaze, shift the coating closer to half flour and half cornstarch so the crust holds up under the liquid.
- Do not go heavier on the baking powder than about a tablespoon per two cups of dry mix, or the coating picks up a metallic edge.
Frequently Asked Questions
Q: Why does my breading fall off in the pan?
A: Usually because the chicken was wet when it was coated, or because the coated pieces went straight into the oil. Dry the chicken well, stir a couple tablespoons of flour into the buttermilk so the coating has something to grip, and rest the dredged pieces on a rack 10 to 15 minutes so the flour hydrates and sets.
Q: Can I skip the overnight air-dry if I am short on time?
A: You can, but it is the step doing the most work. A shorter version helps: pat the pieces dry and leave them uncovered in the refrigerator for 30 minutes to a few hours. Any surface water you remove before cooking is water that does not turn to steam and soften your crust.
Q: What oil should I use, and how hot?
A: A neutral oil with a high smoke point, like peanut, canola, grapeseed or avocado. Hold it between 325 and 350 degrees. Under 300 and the coating absorbs oil instead of sealing; over 375 and the crust darkens before the meat is cooked.
Q: Will an air fryer give me the same crust?
A: Not the same, but a decent one. A lighter coating and good airflow around each piece get you real crunch, and cornstarch helps because it dries the surface. Deep frying still wins on texture, so treat the air fryer as a different dish rather than a swap.