When Costco dropped its peanut butter chocolate cream pie on March 13, 2023, the day before Pi Day, people lost their minds. Shoppers raced to their local warehouse, TikTok blew up, and the thing sold out in seconds. It is almost 5 pounds, costs $19.99, and carries item number 1728395. Folks have been chasing it ever since.
I get the hype. That peanut butter layer really does taste like the inside of a Reese’s cup folded into whipped cream. But there is a dark secret hiding behind that pretty graham crust, and once you know it, you cannot un-know it. The good news? You can make a better version at home for less money, and I am going to show you exactly how.
The Dark Secret Behind That Famous Slice
Here is the part nobody mentions while they are shoveling in forkfuls. The thing that makes this pie taste so peanut buttery is barely peanut butter at all. According to a detailed ingredient breakdown, real peanut butter shows up near the very bottom of the list, which means there is very little of it compared to everything else.
And what is everything else? High fructose corn syrup, palm kernel oil, and a long parade of additives most people cannot pronounce. The corn syrup is sneaky too. It turns up in the whipped topping and again in the graham crust, so you are getting a double dose of cheap filler. The fancy chocolate top? That is the same “liquid truffle” mousse Costco pumps into its giant sheet cakes. The pie even went out of stock because the sheet cakes get first dibs on that whipped filling, according to a store employee. So you are paying twenty bucks for recycled cake mousse and a thimble of actual peanut butter.
Why Making It Yourself Beats the Box
When you build this pie in your own kitchen, peanut butter stops being an afterthought and becomes the headliner. You control how much goes in, and you use the real stuff straight from the jar. No mystery oils, no corn syrup, no waiting around for a “Peanut Butter Pie Sighting” at your warehouse.
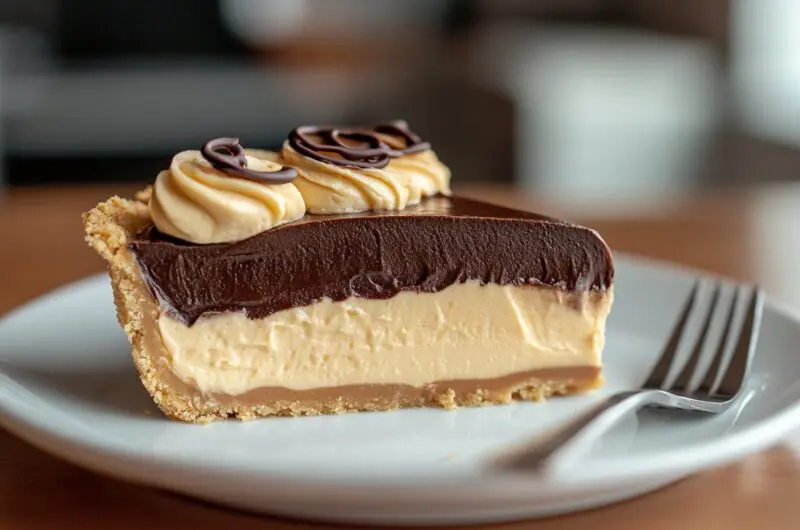
The structure is dead simple, and the best part is there is almost no cooking involved. A copycat version follows Costco’s lead with three layers: a graham crust, a peanut butter mousse, and a chocolate mousse on top. The only real cost is patience, because everything needs to chill. Trust me, your wallet and your peanut butter craving will both thank you.
The Ingredients That Actually Matter
You do not need anything weird. Graham cracker crumbs, sugar, and melted butter make the crust. For the peanut butter layer you want softened cream cheese, a good creamy peanut butter like Jif or Skippy, powdered sugar, vanilla, and heavy cream. The cream cheese is what gives it that tangy, almost cheesecake bite that the original is loved for.
The chocolate layer is where the trick lives. A smart copycat uses mini marshmallows melted with chocolate. The marshmallows have just enough gelatin to help the layer set without weighing it down, so the chocolate flavor still comes through clean and soft. I like dark chocolate chips here because that peanut butter mousse is already very sweet, and a little bitterness balances the whole thing out.
Building Your Three Layers
Start with the crust by pressing the buttery crumb mixture into your pan and chilling it. No oven required. Then whip your heavy cream to stiff peaks and set it aside, because you will split it between both mousse layers.
Beat the cream cheese, peanut butter, powdered sugar, and vanilla until smooth, then gently fold in half of the whipped cream. Save a little of this mixture for piping on top later, just like Costco does with its decorative swirls. Spread the rest into the crust. Melt the chocolate and marshmallows together, let it cool a bit, fold in the remaining whipped cream, and spread that over the peanut butter layer. The original pie nails that silky, fluffy texture, and folding instead of stirring is how you get there.
Mistakes That Will Ruin Your Pie
The biggest one is rushing the chill time. This pie needs at least 6 hours in the fridge, and overnight is even better. Slice it too early and you get a soupy mess instead of clean layers. The store version actually improves the longer it sits, and the homemade one is the same way.
Mistake number two is using cold cream cheese. If it is not fully softened, you will fight lumps the whole time and never get that smooth mousse. Mistake number three is pouring hot melted chocolate straight onto the whipped cream. Let it cool first or it will deflate everything into a sad puddle. Take your time on these three things and the pie comes out beautiful.
Make It Ahead and Keep It Fresh
This is a dream make-ahead dessert. You can press the crust into the pan and stash it in the fridge for up to a week, or freeze it for up to three months before you ever fill it. That breaks the work into easy pieces if you are prepping for a party.
Leftovers keep covered in the fridge for about five days. It also freezes well, and the smart move is to slice it before freezing so you can grab one piece at a time without thawing the whole thing. Pull a slice out, let it sit a few minutes, and it is ready.
Easy Ways to Switch It Up
Want it more like a Reese’s? Chop up some peanut butter cups and scatter them between the layers. Want a deeper chocolate hit? Swap the dark chocolate chips for a mix of dark and milk, which gets you closer to that E.L. Fudge cookie flavor people rave about in the original.
You can also lean into shortcuts. A store-bought graham crust works fine on a busy night, and a sprinkle of crushed graham crumbs over the top adds that crunchy finish since everything else is soft. However you build it, you end up with a pie that tastes like the famous one but actually leads with peanut butter instead of burying it.
Copycat Costco Peanut Butter Chocolate Cream Pie
Course: DessertCuisine: American12
servings30
minutes5
minutes480
kcalA no-bake copycat that puts real peanut butter front and center instead of cheap filler.
Ingredients
2 cups graham cracker crumbs (about 14 full sheets)
1/3 cup granulated sugar
6 tablespoons unsalted butter, melted
8 oz cream cheese, softened
1 cup creamy peanut butter
1 cup powdered sugar
1 teaspoon vanilla extract
2 1/2 cups heavy whipping cream, divided
1 1/2 cups dark chocolate chips and 1 1/2 cups mini marshmallows
Directions
- Stir the graham cracker crumbs, granulated sugar, and melted butter together until the mixture looks like wet sand. Press it firmly into the bottom and up the sides of a 9-inch pie pan. Chill it in the fridge while you work on the filling.
- Pour 2 cups of the heavy cream into a cold bowl and whip it to stiff peaks. Set it aside, since you will split it between both mousse layers. Keep it in the fridge so it stays firm.
- In a large bowl, beat the softened cream cheese, peanut butter, powdered sugar, and vanilla until completely smooth with no lumps. Gently fold in half of the whipped cream until the mixture is light and fluffy. Scoop about a half cup into a piping bag and refrigerate it for the garnish.
- Spread the rest of the peanut butter mousse into the chilled crust in an even layer. Smooth the top with a spatula so the chocolate layer sits flat later. Return the pie to the fridge.
- In a saucepan over low heat, melt the dark chocolate chips and mini marshmallows with the remaining 1/2 cup heavy cream. Stir constantly until smooth and glossy. Take it off the heat and let it cool for about 10 minutes so it is no longer hot to the touch.
- Fold the remaining whipped cream into the cooled chocolate mixture in two batches. Work gently so you keep as much air as possible. The result should be a soft, moussey chocolate that holds its shape.
- Spread the chocolate mousse over the peanut butter layer and smooth the top. Pipe the reserved peanut butter mousse around the edge in decorative swirls. Add a light dusting of graham crumbs in the center if you like.
- Cover the pie loosely and refrigerate for at least 6 hours, or overnight for the cleanest slices. When ready, dip a knife in warm water and wipe it between cuts for sharp, neat pieces. Serve cold.
Notes
- The crust can be pressed into the pan up to a week ahead and kept in the fridge, or frozen for up to three months before filling.
- Let the melted chocolate cool before folding in the whipped cream, or it will deflate the mousse into a puddle.
- Leftovers keep covered for about five days in the fridge, and slices freeze well if you wrap them individually.
Frequently Asked Questions
Q: Why does the real Costco pie have so little actual peanut butter?
A: On the store label, real peanut butter sits near the bottom of the ingredient list, behind whipped topping, sugar, and oils. That means there is very little of it relative to everything else. Making the pie at home lets you load in a full cup of real peanut butter so it leads the flavor.
Q: Can I use natural peanut butter?
A: You can, but the oily, separated kind can make the mousse loose and grainy. For the smoothest texture, stick with a no-stir creamy peanut butter like Jif or Skippy. If you only have natural, mix it very well first and chill the pie a little longer.
Q: Why marshmallows in the chocolate layer?
A: The mini marshmallows melt down and add just enough gelatin to help the chocolate layer set up soft and sliceable. They also add a touch of sweetness, which is why dark chocolate chips work so well as the balance. You will not taste them as marshmallows.
Q: How long does it really need to chill?
A: Give it at least 6 hours, and overnight is even better. Like the original, this pie firms up and tastes better the longer it sits. Slice too early and the layers will slide instead of holding those clean, sharp edges.