Making a grilled cheese sandwich seems simple enough, but getting that perfect crispy, crunchy exterior while keeping the inside gooey and melted can be tricky. Most of us end up with either burnt bread or a soggy mess. Here’s something that might surprise you: the answer to achieving that restaurant-quality crunch is probably sitting in your pantry right now. That bag of potato chips isn’t just for snacking anymore. When mixed with butter and cheese, crushed chips create an incredibly crunchy coating that transforms an ordinary grilled cheese into something spectacular.
Why regular grilled cheese falls short on crunch
Most people make grilled cheese the same way: butter the bread, add cheese, and cook it on the stove. The problem is that butter alone doesn’t create enough texture contrast. Sure, the bread gets golden and slightly crispy, but it’s not that satisfying crunch everyone craves. The butter soaks into the bread rather than staying on the surface, which means you’re missing out on a truly crispy exterior. Plus, if the heat is too high, the outside burns before the cheese melts, and if it’s too low, everything turns out soggy.
This is where potato chips come in to save the day. Instead of relying solely on butter, mixing crushed chips into a butter-based spread creates a coating that stays crispy even as the cheese melts inside. The chips add a layer of texture that regular butter just can’t achieve. Think about it: chips are already perfectly crispy and salty, so when they’re crushed and combined with butter, they create an ideal coating for bread. The result is a sandwich with an audible crunch that pairs perfectly with the soft, melty cheese inside.
How to make the potato chip butter spread
Making this game-changing spread is incredibly simple and doesn’t require any special equipment or ingredients. Start with half a stick of softened butter in a mixing bowl. The butter needs to be soft enough to mix easily but not melted. Add about a quarter cup of shredded mild cheddar cheese, a teaspoon of garlic powder, and a generous handful of potato chips. Now comes the fun part: crush the chips right into the mixture using a fork or your hands. Keep crushing and stirring until everything combines into a thick, spreadable paste.
The consistency should be similar to chunky peanut butter, with small pieces of chips throughout. Don’t worry about crushing the chips into dust—leaving some bigger pieces creates extra pockets of crunch. The butter holds everything together while the cheese adds richness and helps the mixture stick to the bread. Once mixed, the spread is ready to use immediately, or it can be stored in the refrigerator for up to a week. Just make sure to let it soften again before spreading if you’ve refrigerated it, otherwise it’ll tear the bread when you try to spread it on.
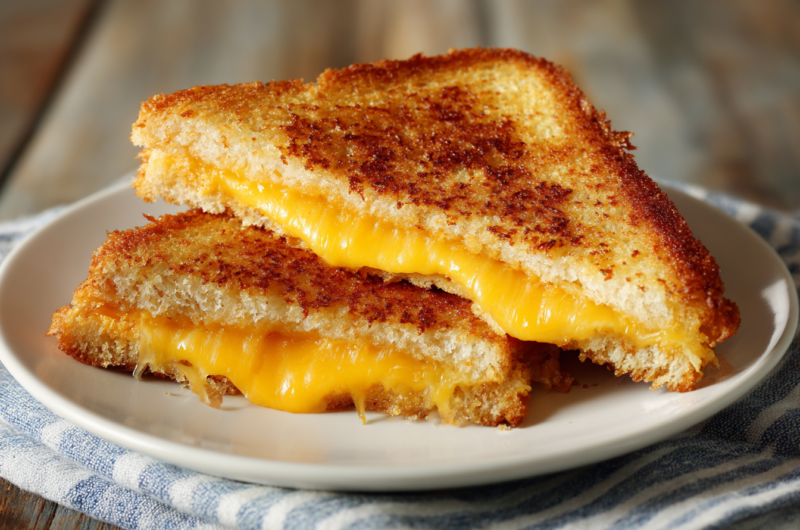
Assembling and cooking the perfect crunchy sandwich
Now that the spread is ready, it’s time to put together the sandwich. Take two slices of your favorite bread—white, wheat, sourdough, whatever works for you. Spread the potato chip mixture generously on one side of each slice. Make sure to cover the entire surface, going all the way to the edges. This ensures every bite has that satisfying crunch. Place your choice of cheese between the slices with the spread facing outward. American cheese melts beautifully, but cheddar, Swiss, or even pepper jack work great too.
Heat a skillet over medium-low heat and place the sandwich in the pan. Here’s a crucial tip: cover the pan with a lid. This traps heat and helps the cheese melt evenly while the outside gets crispy. Cook for about three to four minutes on each side, checking occasionally to make sure it’s not burning. The lid creates a sort of oven effect that melts the cheese perfectly while the chip coating turns golden and crispy. When both sides are golden brown and the cheese is completely melted, remove from heat and let it rest for a minute before cutting. This brief rest helps the cheese set slightly, preventing it from oozing out everywhere when you slice it.
Different chip varieties for different tastes
The beauty of this method is that the type of chips used can completely change the sandwich. Regular salted potato chips work wonderfully and let the cheese shine through. But why stop there? Kettle-cooked chips add extra crunch and a slightly sweet, caramelized potato taste. Ridged chips provide more texture and create deeper pockets of crispiness. Wavy chips work similarly, giving the coating more dimension and making it even crunchier. Each type of chip brings its own personality to the sandwich.
Flavored chips open up a whole new world of possibilities. Sour cream and onion chips add a tangy kick that pairs beautifully with sharp cheddar. Barbecue chips bring a smoky, sweet element that works great with smoked gouda. Salt and vinegar chips create a bright, acidic contrast that cuts through rich, fatty cheeses. Even Flamin’ Hot Cheetos can be used for a spicy, intensely flavored crust that turns a simple grilled cheese into something bold and exciting. The neutral butter base lets the chip flavor shine through without overwhelming the cheese.
Cheese pairings that work best with chip crusts
While any cheese technically works with this method, some combinations are better than others. American cheese remains the classic choice because it melts smoothly and evenly without separating or becoming greasy. Cheddar brings more sharpness and complexity, especially if using an aged variety. Swiss cheese adds a nutty, slightly sweet element that pairs well with plain salted chips. Monterey Jack melts beautifully and has a mild, creamy taste that doesn’t compete with flavored chips.
For something more adventurous, try mixing multiple cheeses. A combination of mozzarella and cheddar gives both stretch and taste. Pepper jack adds heat that complements barbecue or jalapeño chips. Goat cheese creates a tangy, creamy interior that contrasts nicely with the crunchy exterior. Gruyere offers a sophisticated, nutty richness that elevates the entire sandwich. When using stronger cheeses, stick with plain or lightly salted chips so the cheese can be the star. With milder cheeses, flavored chips can add the extra oomph needed to make the sandwich interesting.
Adding extra ingredients without losing the crunch
The chip-crusted grilled cheese works as a base for all kinds of additions. Crispy bacon adds smokiness and extra crunch that complements the chip coating. Thinly sliced tomatoes bring freshness and acidity, though they should be patted dry first to avoid making the sandwich soggy. Caramelized onions add sweetness and depth without compromising the crispy exterior. Sliced avocado provides creaminess, and its mild taste doesn’t interfere with the chip coating. Even a thin layer of pesto or mustard can add complexity.
The key to maintaining crunchiness with add-ins is to keep them thin and relatively dry. Thick slices of wet ingredients will steam the inside and potentially make the coating less crispy. Pat vegetables dry with paper towels before adding them. If using something like pulled pork or leftover meat, make sure it’s not swimming in sauce. A little moisture is fine, but too much will defeat the purpose of the crunchy crust. Layer ingredients close to the center of the sandwich rather than near the edges to keep the coating as crispy as possible.
Bread choices that enhance the chip coating
Not all bread works equally well with this technique. Standard white bread is the traditional choice and provides a neutral backdrop that lets the chips and cheese shine. Sourdough adds tanginess and has a sturdier structure that holds up well to the coating. Texas toast, with its thickness, creates a more substantial sandwich with even more room for cheese. Rye bread brings an earthy, slightly sour taste that pairs surprisingly well with salt and vinegar chips. Whole wheat adds nuttiness and extra fiber without interfering with the crunch.
Italian bread and French bread also work beautifully, especially the slightly crusty varieties sold in bakery sections. These breads have enough structure to support the coating without falling apart. Avoid overly soft breads like potato bread or Hawaiian rolls, as they tend to get mushy under the weight of the coating and cheese. Also skip breads with large holes like ciabatta, since the spread will fall through the gaps. The ideal bread has a tight crumb, even texture, and enough body to stay crispy once cooked. Slicing bread about half an inch thick works best for this method.
Making multiple sandwiches for a crowd
When making chip-crusted grilled cheese for several people, efficiency becomes important. Mix up a larger batch of the chip-butter spread ahead of time and keep it in the fridge. Assemble all the sandwiches at once, spreading the coating on every slice before cooking. This assembly-line approach saves time and ensures consistency. If cooking multiple sandwiches, consider using a griddle instead of a skillet. A griddle provides more surface area and can cook four to six sandwiches simultaneously, which is much faster than working in batches.
Another option is to finish the sandwiches in the oven. Cook them on the stovetop just long enough to crisp the coating on both sides, then transfer to a baking sheet and place in a 350-degree oven for a few minutes. This melts the cheese evenly while keeping everything warm. If serving at a party, these sandwiches can be cut into quarters or smaller pieces for appetizers. They stay crispy for about 15 minutes after cooking, which gives a decent window for serving. Just avoid stacking them directly on top of each other, as trapped steam will soften the coating. Instead, arrange them in a single layer on a platter.
Troubleshooting common problems with chip-crusted sandwiches
Sometimes the coating doesn’t turn out as expected, but most issues have simple fixes. If the coating burns before the cheese melts, the heat is too high. Lower the temperature and cook more slowly with the lid on. If the coating won’t stick to the bread, the butter might be too cold or the bread too moist. Make sure the butter is properly softened and consider toasting the bread lightly before spreading the mixture. If the coating falls off in the pan, it wasn’t spread thickly enough or the chips weren’t crushed sufficiently into the butter.
Sometimes the inside stays cold while the outside gets crispy. This happens when the cheese is too cold or the slices are too thick. Use room-temperature cheese and slice it thinly or grate it for better melting. If the sandwich tastes too salty, the chips and cheese combination might be too much. Switch to unsalted butter or use less cheese in the coating. If the texture is soggy rather than crunchy, the pan wasn’t hot enough to start, or too much butter was used. The coating should sizzle when it hits the pan. Getting the technique right might take a sandwich or two, but once mastered, this method produces consistently crunchy results.
This simple trick of adding crushed potato chips to a butter spread completely changes what a grilled cheese can be. The satisfying crunch combined with perfectly melted cheese creates something that’s way better than the standard version. Whether using regular chips or getting creative with flavored varieties, this technique is easy enough for anyone to master. Next time that grilled cheese craving hits, reach for those chips and transform an everyday sandwich into something special that everyone will want seconds of.
Potato Chip Crusted Grilled Cheese
Course: Lunch RecipesCuisine: American2
sandwiches10
minutes8
minutes520
kcalThis incredibly crunchy grilled cheese uses crushed potato chips mixed into a butter spread for the crispiest, most satisfying sandwich you’ll ever make.
Ingredients
4 tablespoons (half stick) unsalted butter, softened to room temperature
1/4 cup shredded mild cheddar cheese
1 teaspoon garlic powder
1 cup potato chips (any variety)
4 slices bread of choice
4-6 slices American cheese or 1 cup shredded cheese of choice
Directions
- Place the softened butter in a medium mixing bowl. Add the shredded cheddar cheese and garlic powder to the bowl. Make sure the butter is soft enough to mix easily but not melted, as this helps create the right consistency for spreading.
- Add the potato chips to the bowl with the butter mixture. Using a fork or your hands, crush the chips directly into the butter, breaking them into smaller pieces. Continue crushing and stirring until all ingredients are well combined into a thick, spreadable paste with small chip pieces throughout.
- Take two slices of bread and spread the potato chip mixture generously on one side of each slice, covering the entire surface all the way to the edges. Use about a quarter of the mixture per slice, applying it in an even layer. Repeat with the remaining two slices of bread for the second sandwich.
- Place the cheese between two bread slices with the chip-coated sides facing outward. Use 2-3 slices of American cheese or about half a cup of shredded cheese per sandwich. Press gently to help the sandwich hold together while assembling.
- Heat a large skillet over medium-low heat. Once the pan is warm, place one sandwich in the skillet. Cover the pan with a lid to trap heat and help the cheese melt evenly. This covered cooking method is crucial for getting perfectly melted cheese while achieving a crispy exterior.
- Cook the sandwich for 3-4 minutes on the first side, checking occasionally by lifting the edge with a spatula to monitor browning. The coating should turn golden brown and crispy. If it’s browning too quickly, reduce the heat slightly to prevent burning before the cheese melts.
- Carefully flip the sandwich using a spatula, cover again with the lid, and cook for another 3-4 minutes on the second side. The sandwich is done when both sides are golden brown and crispy, and the cheese is completely melted. You should see cheese beginning to ooze slightly from the edges.
- Remove the sandwich from the heat and let it rest on a cutting board for about one minute before slicing. This brief resting period allows the cheese to set slightly, preventing it from oozing out everywhere when cut. Slice diagonally and serve immediately while still hot and crispy. Repeat the cooking process with the second sandwich.
Notes
- The chip-butter spread can be made ahead and stored in the refrigerator for up to one week. Let it soften at room temperature before using to avoid tearing the bread.
- For extra flavor, try using flavored potato chips like sour cream and onion, barbecue, or even Flamin’ Hot Cheetos instead of plain chips.
- Cooking with the lid on is essential for melting the cheese properly while achieving a crispy exterior. Don’t skip this step.
- If making multiple sandwiches, a griddle works better than a skillet as it can cook several at once.
- For best results, use room temperature cheese as it melts more evenly than cold cheese straight from the refrigerator.
Frequently asked questions
Q: Can I use any type of potato chips for this recipe?
A: Yes, any type of potato chips works great. Regular salted chips are perfect for a classic taste, but kettle chips add extra crunch, and flavored varieties like barbecue or sour cream and onion bring additional taste to the sandwich. Even tortilla chips or flavored snacks like Doritos can be used for different variations.
Q: Why does the recipe call for covering the pan with a lid?
A: Covering the pan traps heat and creates a mini-oven effect that melts the cheese evenly while the chip coating gets crispy. Without the lid, the outside might burn before the cheese melts, or the cheese might not melt completely. This simple step makes a huge difference in the final result.
Q: Can I make the chip-butter spread ahead of time?
A: Absolutely. Mix up a larger batch and store it in an airtight container in the refrigerator for up to a week. Just remember to let it soften at room temperature for about 15-20 minutes before using, otherwise it will be too hard to spread and might tear the bread.
Q: What should I do if my coating keeps falling off in the pan?
A: This usually happens when the mixture isn’t spread thickly enough or the chips weren’t crushed well into the butter. Make sure to really work the chips into the butter to create a cohesive paste, and spread a generous layer on the bread going all the way to the edges. Pressing the sandwich gently with the spatula while cooking also helps the coating stay put.