Most people think they know how to bake a potato. After all, it’s just throwing a spud in the oven and waiting, right? Wrong. There’s actually a much better way to make baked potatoes that creates a crispy skin on the outside and a fluffy, creamy interior that practically melts in your mouth. The technique isn’t complicated, but it does require a few specific steps that most of us skip. Once you try this method, you’ll never go back to your old way again.
Choosing the right potato makes all the difference
Not all potatoes are created equal when it comes to baking. The best choice is always a large russet potato, and size really does matter here. Russets have a high starch content that makes them fluffy and creamy when cooked at high temperatures. They’re also thick-skinned, which means they get that crispy exterior everyone loves. Other potato varieties like red potatoes or Yukon golds are better for boiling or roasting because they have less starch and more moisture.
When shopping for russets, look for the biggest ones available. This isn’t a side dish situation. A properly baked potato should be the star of your meal, loaded up with all your favorite toppings. Smaller potatoes won’t give you enough space for all that butter, sour cream, cheese, and bacon you’re planning to pile on. Plus, according to cooking experts, larger potatoes have a better ratio of crispy skin to fluffy interior, which is exactly what makes a baked potato so satisfying.
Skip the microwave if you want real results
Sure, microwaving a potato is fast and convenient. It’s tempting when you’re hungry and don’t want to wait an hour for dinner. But here’s the thing: microwaved potatoes taste completely different from oven-baked ones. The microwave steams the potato from the inside out, which creates a dense, almost gummy texture. You also miss out on that golden, crispy skin that makes baked potatoes so good. The texture is just not the same, no matter how you try to dress it up afterward.
Taking the time to properly bake your potato in the oven creates a completely different eating experience. The dry heat of the oven draws moisture out of the skin while cooking the inside low and slow. This gives you that perfect combination of textures that makes baked potatoes so special. Some people try to compromise by starting in the microwave and finishing in the oven, but even that doesn’t compare to going all-in with the oven method from start to finish.
Prepping the potato properly sets you up for success
Before your potato goes anywhere near the oven, it needs some attention. Start by washing it thoroughly under cold water and scrubbing away any dirt with a vegetable brush. Don’t skip this step because you’re eating the skin, and nobody wants gritty potato skin. After washing, dry the potato completely with a towel. This is important because the drier the skin, the crispier it will get in the oven.
Next, grab a fork and poke holes all over the potato, about eight to ten times. These holes let steam escape while the potato bakes, preventing it from exploding in your oven (yes, that can actually happen). Then rub the entire potato with olive oil or vegetable oil, making sure to coat it evenly. Finally, sprinkle it generously with coarse salt. The oil helps the salt stick and also contributes to that crispy skin everyone craves. Some people wrap their potatoes in foil, but that actually steams the potato and makes the skin soft instead of crispy.
Temperature and timing require patience
Set your oven to 350 degrees Fahrenheit and make sure it’s fully preheated before the potato goes in. Some recipes call for higher temperatures like 400 or 425 degrees, but 350 gives you more control and prevents burning. A medium to large russet potato needs about 60 to 75 minutes at this temperature. That might seem like forever when you’re hungry, but rushing this process will leave you with an undercooked potato that’s hard in the middle.
Testing for doneness is simple but requires a gentle touch. Put on an oven mitt or use a dish towel to protect your hands, then gently squeeze the potato. If it gives easily and feels soft, it’s done. If there’s any resistance or it feels firm, give it another 10 to 15 minutes. Another trick is to insert a fork or knife into the center. It should slide in easily without any resistance. Don’t be tempted to crank up the heat to speed things up because that will just burn the outside while leaving the inside raw.
Never put potatoes directly on the baking sheet
Here’s a mistake almost everyone makes: placing the potato directly on a baking sheet. When the potato sits flat against metal, that spot doesn’t get air circulation and ends up with a dark brown or even burned patch. That section also stays moist instead of getting crispy like the rest of the skin. It’s a small detail, but it makes a noticeable difference in the final result.
The solution is easy. Either place a wire cooling rack on top of your baking sheet and put the potatoes on that, or create a bed of coarse salt on the sheet and nestle the potatoes into it. Both methods lift the potato off the pan and allow hot air to circulate all around it. The salt method has an added bonus because some of that salt flavor actually cooks into the bottom of the potato skin. According to cooking tips, this simple change elevates your baked potato from good to great.
The secret massage technique changes everything
Once your potato comes out of the oven, let it cool for about five minutes until you can handle it comfortably. This is where most people go wrong. The natural instinct is to just slice it open and start loading on toppings. But there’s a crucial step in between that transforms the texture from ordinary to extraordinary. Using your hands, gently massage and squeeze the potato all over, working your way around it systematically.
This massage breaks up the interior flesh and makes it light and fluffy instead of dense and packed together. The difference is dramatic. Without this step, the inside of your potato will be more like a boiled potato, which is fine but not special. With the massage, the inside becomes almost cloud-like while still maintaining enough structure to hold all your toppings. After massaging, make your cut lengthwise down the center, but don’t slice all the way through. Leave about an inch on each end intact, then use your thumbs and forefingers to push the ends toward each other while pressing down. This opens the potato up perfectly.
Room temperature toppings melt better than cold ones
Nothing ruins a perfect baked potato faster than cold toppings straight from the refrigerator. When you dump cold sour cream, cold butter, and cold cheese onto a hot potato, those toppings just sit there in clumps instead of melting into every little pocket and crevice. The temperature shock also cools down your potato faster, and nobody wants to eat a lukewarm baked potato. It’s such a simple thing to avoid, but it makes a huge impact.
The fix is easy: just take your butter, sour cream, cheese, and any other toppings out of the fridge when you start prepping your potatoes. By the time your potatoes are done baking an hour later, everything will be at room temperature. The butter will melt instantly into the fluffy interior, the sour cream will spread smoothly, and the cheese will get all gooey and delicious. This small change makes every bite so much better. Add some fresh chives or green onions at the end for a pop of color and freshness that balances out all that rich, creamy goodness.
The bloomin’ potato takes things to another level
If you really want to impress, there’s an advanced technique called the bloomin’ potato method. Instead of just cutting a simple cross or line down the top, you make a grid pattern of cuts across the entire potato before baking. The cuts should go about three-quarters of the way down but not all the way through to the bottom. This creates a checkered pattern that opens up during baking, kind of like a flower blooming.
The bloomin’ method creates way more surface area for toppings to sink into, and it also makes more of the potato interior get crispy during baking. Each little square section gets its own crispy edges while staying creamy in the middle. According to food bloggers, this technique has become popular because it’s not much harder than the regular method, but the presentation looks impressive and the eating experience is even better. Just make your cuts carefully with a sharp knife, being careful not to slice all the way through.
Common topping combinations that always work
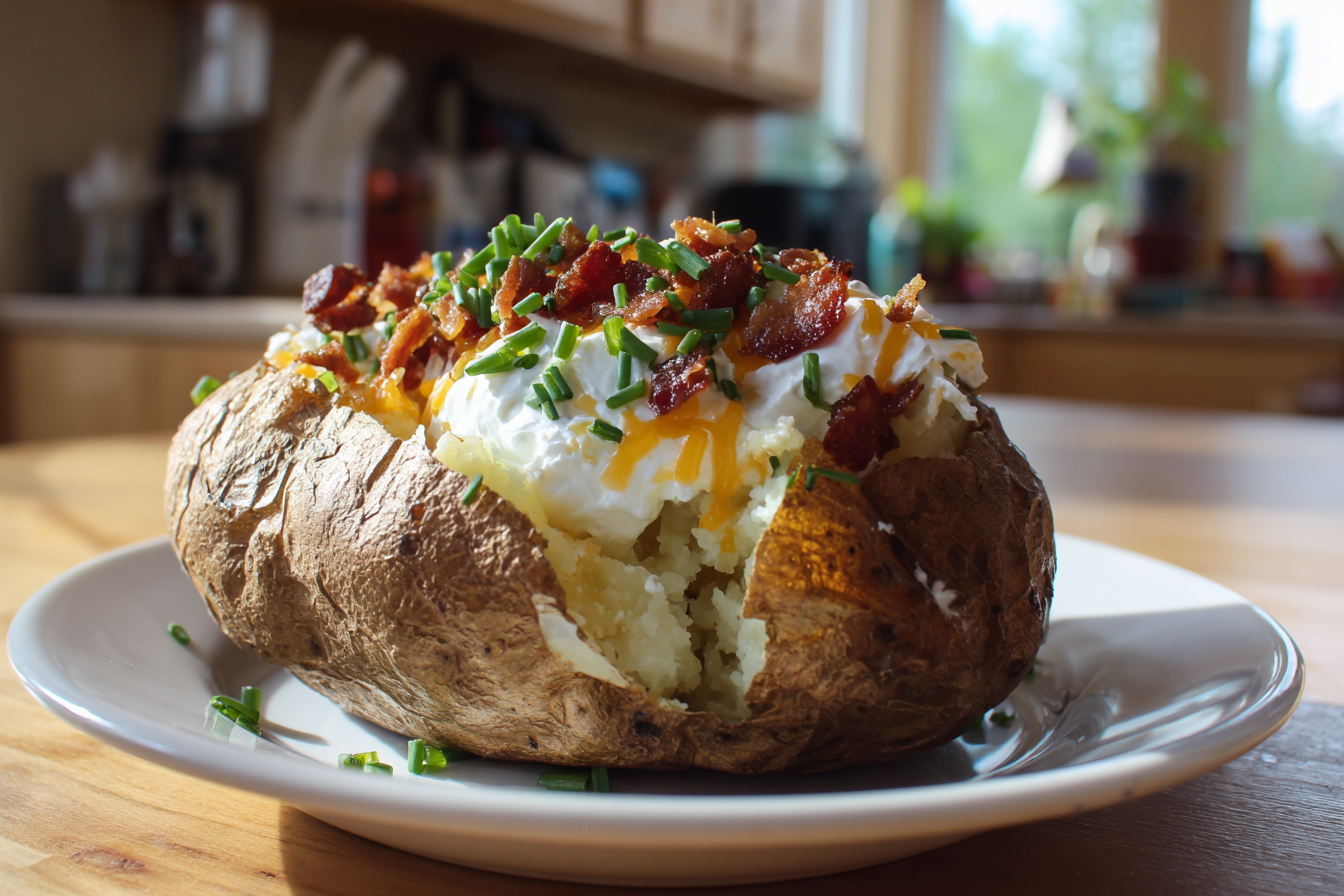
The classic loaded baked potato includes butter, sour cream, shredded cheddar cheese, bacon bits, and chopped chives or green onions. This combination is popular for good reason because all these elements work together perfectly. The butter and sour cream add richness and creaminess, the cheese adds a salty sharpness, the bacon provides smoky crunch, and the chives add a fresh, mild onion bite that cuts through all the heavy stuff.
But don’t feel limited to just the classic combination. Broccoli and cheese is another favorite, especially if you want to add some vegetables to your meal. Chili and cheese turns your baked potato into a hearty, filling dinner. Buffalo chicken with blue cheese dressing and celery makes for a fun twist. Pulled pork with coleslaw creates a barbecue-inspired version. The beauty of a perfectly baked potato is that it’s a blank canvas that works with almost any toppings. Just remember to keep those toppings at room temperature so they melt properly into all those fluffy pockets.
Making the perfect baked potato isn’t difficult, but it does require following a few important steps that most people skip. Choose large russet potatoes, skip the microwave, prep them properly with oil and salt, bake them on a rack at 350 degrees for about an hour, massage them before cutting, and use room temperature toppings. These simple changes turn an ordinary baked potato into something really special that’s worthy of being the main event at dinner.
Perfect Oven Baked Potato
Course: Dinner RecipesCuisine: American4
servings10
minutes1
hour15
minutes280
kcalThis foolproof method creates baked potatoes with perfectly crispy skin and fluffy, cloud-like interiors that blow away anything you’ve made before.
Ingredients
4 large russet potatoes (about 10-12 ounces each)
2 tablespoons olive oil or vegetable oil
2 tablespoons coarse salt (kosher or sea salt)
4 tablespoons butter, at room temperature
1 cup sour cream, at room temperature
1½ cups shredded cheddar cheese, at room temperature
½ cup crumbled cooked bacon
¼ cup chopped fresh chives or green onions
Black pepper to taste
Directions
- Preheat your oven to 350 degrees Fahrenheit and make sure it reaches full temperature before adding the potatoes. While the oven heats, place a wire cooling rack on top of a rimmed baking sheet, or alternatively, pour a thick layer of coarse salt onto the baking sheet to create a bed for the potatoes. This setup ensures proper air circulation around the potatoes during baking.
- Wash each potato thoroughly under cold running water, scrubbing with a vegetable brush to remove all dirt and debris from the skin. Pat the potatoes completely dry with paper towels or a clean kitchen towel, making sure no moisture remains on the surface. The drier the skin, the crispier it will become during baking.
- Using a fork, pierce each potato 8 to 10 times all over, creating holes that will allow steam to escape during baking. Rub each potato all over with olive oil, using about half a tablespoon per potato, making sure to coat the entire surface evenly. Sprinkle the coarse salt generously over each oiled potato, using your hands to press the salt into the skin so it adheres properly.
- Place the prepared potatoes on the wire rack or salt bed, spacing them at least an inch apart to allow for even heat circulation. Bake for 60 to 75 minutes, depending on the size of your potatoes, until they feel soft when gently squeezed with an oven mitt. Test for doneness by inserting a fork or knife into the center, which should slide in easily without any resistance.
- Remove the potatoes from the oven and let them cool for about 5 minutes until you can handle them comfortably with your bare hands. Holding each potato carefully, use both hands to gently massage and squeeze it all over, working systematically around the entire potato. This crucial step breaks up the interior flesh and creates that light, fluffy texture that makes these potatoes special.
- Using a sharp knife, cut each potato lengthwise down the center, but don’t slice all the way through to the bottom. Leave about an inch uncut on each end of the potato to keep it intact. Position your thumbs on one end and your forefingers on the other end, then gently push the ends toward each other while pressing down with your thumbs to open up the potato and expose the fluffy interior.
- Add a tablespoon of room temperature butter to each opened potato first, allowing it to melt into all the fluffy pockets and crevices. Follow with a generous dollop of room temperature sour cream, spreading it slightly so it seeps into the potato. The room temperature toppings will melt perfectly instead of sitting in cold clumps.
- Top each potato with a generous amount of shredded cheddar cheese, followed by crumbled bacon, and finish with a sprinkle of fresh chives or green onions. Add freshly ground black pepper to taste. Serve immediately while the potatoes are still hot and the cheese is melting into every corner.
Notes
- Choose the largest russet potatoes you can find for the best ratio of crispy skin to fluffy interior. Smaller potatoes won’t give you as much room for toppings.
- Never wrap your potatoes in aluminum foil, as this steams them instead of baking them and prevents the skin from getting crispy.
- If you want to try the bloomin’ potato method, make a grid of cuts across the top of each potato before baking, cutting three-quarters of the way down but not all the way through.
- Leftover baked potatoes can be refrigerated and reheated in a 350-degree oven for about 15-20 minutes, though the skin won’t be quite as crispy as when freshly baked.
- Feel free to customize toppings based on your preferences – try broccoli and cheese, chili, buffalo chicken, or pulled pork with coleslaw.
Frequently asked questions
Q: Can I use red potatoes or Yukon gold potatoes instead of russets?
A: While you technically can bake any potato, russets work best because of their high starch content. Red potatoes and Yukon golds have more moisture and less starch, which means they won’t get as fluffy on the inside. They’re better suited for boiling, roasting, or making potato salad where you want them to hold their shape.
Q: Why do my baked potatoes always come out dry and dense?
A: This usually happens when you skip the massage step after baking. That gentle squeezing and massaging breaks up the interior flesh and creates air pockets that make the potato light and fluffy. Without it, the cooked potato stays compressed and dense. Also make sure you’re baking at 350 degrees rather than higher temperatures, which can dry them out.
Q: How do I know when my baked potato is actually done?
A: Put on an oven mitt and gently squeeze the potato. It should give easily and feel soft throughout. If there’s any firmness or resistance, it needs more time. You can also insert a fork or knife into the center – it should slide in without any resistance. Don’t rely on cooking time alone since potato sizes vary.
Q: Do I really need to bring my toppings to room temperature?
A: Yes, it makes a huge difference. Cold butter won’t melt properly into the fluffy interior, cold sour cream will just sit in clumps, and cold cheese won’t get gooey. Room temperature toppings melt immediately on contact with the hot potato, seeping into every crevice. Just take everything out of the fridge when you start prepping and they’ll be perfect by the time your potatoes are done.