Most people cook pork chops straight from the fridge and wonder why they turn out dry and tough. The secret to making restaurant-quality pork chops at home isn’t some fancy ingredient or expensive cut of meat. It’s actually about letting your chops sit at room temperature for 30 minutes before cooking and adding just one tablespoon of flour to your spice rub. This simple combination creates a golden crust while keeping the inside juicy and tender every single time.
Why room temperature matters more than you think
When you toss cold pork chops straight into a hot pan, the outside cooks way faster than the inside. This means you end up overcooking the edges while waiting for the center to reach a safe temperature. The result? Dry, chewy meat that tastes like cardboard. Taking your chops out of the fridge 30 minutes before cooking gives the meat time to warm up evenly. This might seem like a small detail, but it makes a huge difference in how the pork cooks through.
While your chops are sitting on the counter, season both sides with salt right away. This gives the salt time to work its way into the meat, not just sit on the surface. The combination of room temperature meat and early salting helps break down some of the proteins, making your chops more tender. Use about a quarter teaspoon of salt per chop, and don’t worry about it being too much. Pork chops are naturally lean, so they need that extra seasoning to taste good.
The flour trick that creates a perfect crust
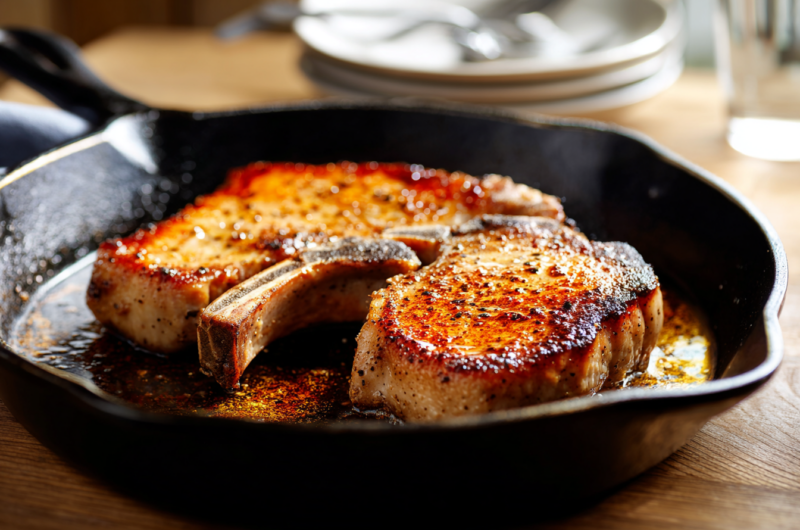
Here’s where things get interesting. Most recipes tell you to rub spices directly onto your meat, but adding just one tablespoon of flour to your spice mix changes everything. The flour helps create an even, golden-brown crust that locks in moisture and adds incredible texture. When flour hits hot oil, it browns beautifully and gives you that restaurant-quality sear without any special equipment. Mix your flour with chili powder, garlic powder, onion powder, smoked paprika, and black pepper for a spice blend that makes your kitchen smell amazing.
The flour doesn’t make your pork chops taste like fried food or add a heavy coating. It’s barely noticeable in the final dish, but it makes the difference between pale, steamed-looking meat and gorgeous caramelized chops. Pat your pork chops completely dry with paper towels before rubbing on the flour-spice mixture. Any moisture on the surface will prevent that beautiful browning. If you’re gluten-free, you can skip the flour entirely, though your crust won’t be quite as even.
Choosing the right thickness makes all the difference
Thin pork chops might seem like they cook faster, but they’re nearly impossible to keep juicy. Those quarter-inch-thick chops you see on sale? They dry out before you can even get a good sear. For this method to work properly, you need pork chops that are at least one inch thick. Thicker chops give you enough time to develop that crispy exterior while keeping the inside moist and tender. When you’re at the grocery store, look for chops that feel substantial in your hand, not flimsy.
Both boneless and bone-in chops work great with this recipe, though bone-in will be slightly more juicy and take a minute or two longer to cook. If you can only find thinner chops, adjust your cooking time down and watch them carefully. A meat thermometer becomes essential when working with different thicknesses. You want to pull your chops off the heat when they hit exactly 145 degrees Fahrenheit. Going past that temperature turns them into shoe leather, no matter how perfect your technique is up to that point.
The sear, flip, and cover method explained
This cooking technique is what separates okay pork chops from incredible ones. Heat your oil in a skillet over medium-high heat until it looks shimmery but not smoking. Add your seasoned chops and resist the urge to move them around. Let them sit undisturbed for two to three minutes until they develop a deep golden crust. If you peek underneath and they’re sticking to the pan, give them another 30 seconds. When they’re ready, they’ll release easily. Flip them once, and if your chops have a fat cap on the edge, use tongs to hold them upright so that fat renders and browns.
Now comes the magic part. After flipping, immediately reduce your heat to low and cover the skillet with a lid. This creates a mini steam environment that gently finishes cooking the inside while keeping everything moist. The trapped heat and steam are what prevent your pork from drying out. Cook for six to twelve minutes depending on thickness, checking the temperature at the five-minute mark and then every two minutes after. Don’t just guess when they’re done. A five-dollar instant-read thermometer will save you from rubbery pork chops forever.
Resting your meat isn’t just fancy chef talk
When your pork chops hit 145 degrees, your first instinct is to cut into them right away and start eating. Don’t do it! Those juices inside the meat are still bubbling and moving around from the heat. If you slice into hot pork immediately, all that moisture runs out onto your cutting board instead of staying in the meat. Transfer your cooked chops to a clean plate and tent them loosely with aluminum foil. Five minutes is all you need, and during that time the internal temperature actually continues rising a few degrees while the juices redistribute throughout the meat.
This resting period also gives you time to make a quick pan sauce without rushing around. The juices that do escape during resting can be poured back into your sauce, so nothing goes to waste. When you finally cut into a properly rested pork chop, the meat stays moist on your plate instead of creating a puddle. The difference is noticeable enough that once you start resting your meat, you’ll never skip this step again. It works for chicken breasts, steaks, and any other protein you’re cooking too.
Making pan sauce from the browned bits
After removing your pork chops, look at the bottom of your skillet. All those dark, crusty bits stuck to the pan are pure gold. That’s concentrated meat and spice that will turn into an incredible sauce with just a few simple additions. While your chops rest, crank the heat back up to medium-high and pour in one cup of chicken stock. The liquid will start bubbling immediately, and as it does, scrape the bottom of the pan with a wooden spoon to release all those stuck bits.
Add a tablespoon of apple cider vinegar and two teaspoons of honey to balance out the richness with some brightness and sweetness. Let this mixture simmer until it reduces by about half, which takes maybe five minutes. The sauce will thicken slightly and taste more concentrated. Turn off the heat and wait for the bubbling to stop completely, then swirl in a tablespoon of butter. This adds richness and gives your sauce a glossy, professional look. Return your pork chops to the pan whole or slice them up so the sauce coats every piece. Sprinkle with fresh parsley if you have it, but dried herbs work fine too.
What kind of oil works best for searing
Regular olive oil isn’t great for this recipe because it starts smoking at lower temperatures, and you need high heat for a good sear. Avocado oil is perfect because it can handle the heat without breaking down or making your kitchen smell burnt. It also has a neutral taste that won’t interfere with your spices. Vegetable oil, canola oil, or grapeseed oil all work just as well if that’s what you have in your pantry. Stay away from butter for the initial searing since it burns too easily at high temperatures.
You only need about one tablespoon of oil for the whole pan, which is enough to prevent sticking and help with browning. Pour it into your skillet and swirl it around to coat the bottom evenly. When the oil starts to shimmer and looks almost wavy, it’s hot enough for your pork chops. If you add the meat too early when the oil is still cold, your chops will stick and steam instead of sear. Wait for that visual cue of shimmering oil, and you’ll get perfect results every time.
Adjusting the spice mix to your preferences
The combination of chili powder, garlic powder, onion powder, smoked paprika, and black pepper creates a smoky, slightly spicy blend that makes pork taste more interesting. But if you hate spice or want something different, swap things around. Regular paprika instead of smoked gives you color without the smokiness. Brown sugar mixed in with your spices adds a sweet crust that caramelizes beautifully. Dried thyme, rosemary, or Italian seasoning all work great with pork too. Just make sure whatever blend you use is salt-free since you already salted your chops earlier.
Some people like using Cajun seasoning or steak seasoning blends that come pre-mixed from the store. That’s totally fine, just check if they contain salt first. The key is mixing your spices with that tablespoon of flour before rubbing everything onto the meat. The specific spices matter less than the technique of creating a dry rub that will form a crust. If you’re cooking for kids who don’t like anything adventurous, even just garlic powder, onion powder, and black pepper mixed with flour makes a huge improvement over plain pork chops.
Simple sides that go perfectly with pork chops
Pork chops need something to soak up that pan sauce, and mashed potatoes are the obvious choice. But mashed cauliflower works just as well if you want something lighter. The creamy texture pairs perfectly with the meat and sauce. For vegetables, anything simple works better than complicated recipes. Roasted asparagus takes fifteen minutes in the oven and doesn’t require any skill. Sautéed zucchini or cabbage cooks in the time your meat is resting, so everything finishes at once. Green beans tossed with butter and garlic are another easy option.
Coleslaw adds a nice crunch and the acidity cuts through the richness of the pork. You can buy pre-shredded cabbage and just toss it with bottled dressing if making it from scratch sounds like too much work. Sauerkraut straight from the jar is another low-effort side that tastes great with pork. For something more filling, try roasted potatoes or rice pilaf. The beauty of this pork chop recipe is that it’s fancy enough for company but quick enough for a weeknight, so you can pair it with whatever sides match your energy level that day.
Getting perfectly cooked pork chops isn’t about following complicated techniques or buying expensive cuts. It comes down to bringing your meat to room temperature, adding a tablespoon of flour to your spice rub, and using the sear-flip-cover method. These three simple changes transform tough, dry pork into something actually worth eating. The pan sauce made from the drippings takes things from good to restaurant-quality with barely any extra effort.
The Best Juicy Skillet Pork Chops
Course: DinnerCuisine: American4
servings30
minutes15
minutes369
kcalTransform ordinary pork chops into tender, juicy perfection with this foolproof skillet method that creates a golden crust and incredible pan sauce.
Ingredients
4 pork chops, about 6 ounces each, 1-inch thick
Salt, to taste (about 1/4 teaspoon per chop)
1 tablespoon all-purpose flour
1 teaspoon chili powder
1 teaspoon garlic powder
1 teaspoon onion powder
1/2 teaspoon smoked paprika
1/2 teaspoon ground black pepper
1 tablespoon avocado oil or vegetable oil
1 cup low-sodium chicken stock
1 tablespoon apple cider vinegar
2 teaspoons honey or brown sugar
1 tablespoon butter
2 tablespoons chopped fresh parsley, optional
Directions
- Remove the pork chops from the refrigerator and place them on a plate. Season both sides generously with salt, using about a quarter teaspoon per chop. Let the chops sit at room temperature for 30 minutes to allow even cooking and better seasoning absorption.
- While the pork chops rest, combine the flour, chili powder, garlic powder, onion powder, smoked paprika, and black pepper in a small bowl. Mix the spice rub thoroughly until all ingredients are evenly distributed. This flour-spice combination will create a beautiful golden crust during cooking.
- After 30 minutes, pat the pork chops completely dry with paper towels on both sides and edges. Rub the spice mixture all over each chop, making sure to coat every surface evenly. Press the rub into the meat gently so it adheres well.
- Heat the oil in a large skillet with a lid over medium-high heat until it shimmers. Carefully place the pork chops in the hot skillet without overcrowding. Let them cook undisturbed for 2 to 3 minutes until a deep golden crust forms and they release easily from the pan.
- Flip the pork chops to the other side. If your chops have a fat cap on the edge, use tongs to hold them upright for about 30 seconds until the fat renders and browns nicely. Immediately reduce the heat to low and cover the skillet with the lid.
- Cook the covered pork chops for 6 to 12 minutes depending on thickness. Start checking the internal temperature with an instant-read thermometer at the 5-minute mark, then every 2 minutes after. Remove the chops when they reach exactly 145°F in the thickest part.
- Transfer the cooked pork chops to a clean plate and tent loosely with aluminum foil. Let them rest for 5 minutes while you make the pan sauce. This resting period allows the juices to redistribute throughout the meat for maximum tenderness and moisture.
- Increase the heat to medium-high and add the chicken stock, apple cider vinegar, and honey to the skillet. Bring to a simmer while scraping the bottom of the pan with a wooden spoon to release all the browned bits. Let the sauce reduce by half, about 5 minutes, then remove from heat and swirl in the butter. Return the pork chops to the pan whole or sliced, spoon the sauce over them, and sprinkle with fresh parsley if desired.
Notes
- For thicker chops over 1 inch, you may need to add a few extra minutes of covered cooking time. Always rely on your thermometer rather than time alone.
- Bone-in pork chops work beautifully with this method but will need an additional 1-2 minutes of cooking time compared to boneless chops.
- If you don’t have a lid for your skillet, aluminum foil crimped over the top works just as well for the covered cooking step.
- The pan sauce is optional but highly recommended. You can skip it for a simpler meal, though you’ll miss out on incredible additional moisture.
- Leftover pork chops can be refrigerated for up to 3 days and reheated gently in a covered skillet with a splash of water or stock to prevent drying out.
Frequently asked questions
Q: Can I use frozen pork chops for this recipe?
A: You need to thaw them completely first, then follow the room temperature step. Cooking frozen or partially frozen pork chops leads to uneven cooking where the outside overcooks before the inside is done. Thaw them overnight in the refrigerator for best results.
Q: What if I don’t have a meat thermometer?
A: You can cut into the thickest part of the chop to check if the juices run clear and the meat is no longer pink. However, a basic instant-read thermometer costs less than ten dollars and removes all the guesswork, making it worth the small investment for consistently perfect results.
Q: Will this method work for thin pork chops?
A: Thin chops under half an inch thick cook too quickly for this technique to work properly. You’ll get the sear but won’t need the covered cooking step. For thin chops, just sear them for about 2 minutes per side over medium heat without the lid.
Q: Can I make this recipe without the pan sauce?
A: Absolutely. The pork chops are delicious on their own with just the spice rub. The pan sauce adds extra moisture and uses up the browned bits in the skillet, but if you’re short on time or want to keep things simple, skip it entirely and the chops will still be juicy and tender.