Remember when desserts took actual planning? Like, you couldn’t just grab something from the freezer five minutes before company arrived. Baked Alaska is one of those showstopper desserts that used to grace dinner tables at fancy occasions, but somewhere along the way, it disappeared from our regular rotation. This towering creation of cake, ice cream, and toasted meringue looks impossibly difficult, but here’s the thing—it’s actually way more forgiving than you’d think, especially when you know the tricks.
What makes this dessert so special anyway
Baked Alaska hit its peak popularity somewhere in the mid-20th century, showing up at wedding receptions, anniversary parties, and holiday gatherings. The whole concept seems wild when you first hear about it—you’re literally putting ice cream in the oven. But that fluffy meringue acts like an insulator, protecting the frozen layer underneath while the outside gets all golden and toasted. People would gasp when it came out of the kitchen, this towering dome of sweetness that somehow defied the laws of kitchen physics.
The dessert supposedly got its name when Alaska became a U.S. territory back in 1867, though some food historians argue about the exact origins. What nobody argues about is how impressive it looks when you bring it to the table. The contrast between hot and cold, the drama of torching the meringue, the way it slices to reveal colorful ice cream layers—it’s basically the original Instagram-worthy dessert, just about 150 years too early.
Why everyone stopped making it at home
Honestly, Baked Alaska got a reputation for being fussy. People heard “meringue” and “oven” and “ice cream” all in the same sentence and decided it was too complicated for a regular Tuesday night. Plus, easier desserts started flooding the market—those no-bake cheesecakes, the boxed cake mixes that took ten minutes, ice cream cakes you could just buy at the grocery store already assembled. Why spend hours on something when you could get similar results with way less effort?
The other issue was timing. Baked Alaska requires some advance planning since you need to freeze everything solid before the final baking step. In our age of instant gratification, that kind of patience feels almost old-fashioned. But here’s what people don’t realize—most of the work happens ahead of time, which actually makes it perfect for entertaining. When your guests arrive, you just pop it in the oven for a few minutes and suddenly you’re a dessert genius.
The genius of make-ahead meringue that actually works
For the longest time, everyone thought you had to make meringue right before serving. It was this whole dramatic thing with egg whites and standing mixers and hoping the humidity wasn’t too high that day. But modern recipes figured out you can actually freeze the entire dessert, meringue and all, then just bake it when you’re ready. This changes everything. You can make this dessert three days before your dinner party, stick it in the freezer, and forget about it until showtime.
The key is making sure everything is frozen absolutely solid before you apply that final blast of heat. Some people use a kitchen torch for extra control, which looks super professional and gives you those perfect golden peaks. Others just crank up the oven to 500 degrees and watch it carefully for about three minutes. Either way works fine. The meringue creates this protective layer that keeps the ice cream from turning into soup, and when you cut into it, you get that satisfying contrast between warm, pillowy topping and cold, creamy center.
Picking your ice cream combinations without overthinking it
Classic Baked Alaska usually features vanilla ice cream, but that’s just the starting point. Mint chocolate chip gives you that retro vibe with a pop of green color. Coffee ice cream pairs beautifully with chocolate cake. Some people go wild with rainbow sherbet for kid-friendly parties. The beauty is you can use whatever’s on sale at the grocery store or whatever your family actually likes. There’s no ice cream police coming to judge your choices.
One trick is using ice cream that’s slightly softened so you can spread it evenly over the cake layer. Not melted, just soft enough to work with. You want smooth layers without air pockets, which helps when you’re slicing later. Some recipes call for two different ice cream types—maybe vanilla on the bottom and strawberry on top, or chocolate and peanut butter. Just make sure to freeze each layer solid before adding the next one, otherwise everything mushes together and you lose those pretty stripes.
The cake base nobody talks about but really matters
You need something sturdy enough to hold all that ice cream without getting soggy, but not so dense that it’s like eating a hockey puck. Pound cake works great. So does a basic sponge cake or even store-bought cake from the bakery section, sliced horizontally. Some people use brownies for a chocolate version, which honestly sounds amazing. The cake should be about half an inch thick and cut to fit whatever bowl or pan you’re using as your mold.
Here’s a shortcut that would make grandma faint but actually works perfectly: use a quality frozen pound cake from the grocery store. Nobody will know, and it saves you an entire baking step. The cake is really just structural support anyway—people come for the ice cream and meringue drama. If you do bake your own, make sure it’s completely cool before assembly, otherwise you’ll start melting your ice cream layers before you even get to the freezer. Been there, watched that disaster unfold, learned the hard way.
Getting the meringue right without a chemistry degree
Meringue seems intimidating, but it’s basically just egg whites and sugar whipped until they hold stiff peaks. Room temperature egg whites whip better than cold ones, so leave them out for about thirty minutes before starting. Make sure your bowl and beaters are completely clean—even a tiny bit of grease will prevent the whites from whipping up properly. Start on medium speed until they get foamy, then gradually add your sugar while increasing to high speed.
You’ll know it’s ready when you can turn the bowl upside down and nothing slides out. That sounds scary but it’s actually the best test. The peaks should stand straight up when you lift the beaters, not flop over sadly. Some recipes add cream of tartar for stability, which helps if you’re making it ahead. Others add a little vanilla extract for extra taste. Spread this fluffy cloud all over your frozen ice cream dome, making sure to seal it completely to the edges so no ice cream peeks through.
Assembly tricks that prevent total meltdown disasters
Work fast, but don’t panic. Line a metal bowl with plastic wrap, leaving plenty of overhang. Spread your softened ice cream into the bowl, making sure to press out any air bubbles. Top with your cake layer, pressing gently to make good contact. Fold that plastic wrap over the top and freeze until rock solid—at least four hours, preferably overnight. When you’re ready to add meringue, unwrap everything, flip it onto your serving plate, and peel off the plastic wrap.
The serving plate matters more than you’d think. Use something oven-safe if you’re baking the meringue, not your grandmother’s fine china that might crack under high heat. A wooden cutting board works in a pinch and looks rustic. Spread the meringue quickly while everything’s still frozen solid, working from bottom to top in swoops and swirls. Don’t worry about making it look perfect—those imperfect peaks actually brown better and look more dramatic. Stick it back in the freezer if you’re not baking immediately.
The final baking step that makes or breaks everything
Preheat your oven to 500 degrees Fahrenheit. Yes, really that hot. Put your frozen dome on the middle rack and watch it like a hawk. You’re looking for golden brown tips on the meringue peaks, which usually takes about three minutes, maybe five at most. The high heat browns the outside while the frozen core stays frozen. Open the oven door even a crack and you’ll lose heat, so resist the urge to peek constantly. Use the oven light instead.
If you’re using a kitchen torch instead, which gives you way more control, keep the flame moving constantly. Hold it a few inches away and work in circular motions until you get the color you want. This method takes longer but you won’t risk over-baking. Either way, serve immediately once it’s browned. The clock is ticking now—you’ve got maybe ten minutes before things start getting soft. Slice with a knife dipped in hot water for clean cuts that show off those pretty layers everyone worked so hard to create.
Modern shortcuts that still deliver the drama
Nobody needs to make this completely from scratch to get impressive results. Store-bought pound cake, quality ice cream from the carton, and meringue from a mix all work fine if you’re short on time or energy. The assembly and presentation are what make Baked Alaska special, not necessarily making every component by hand. Some people even use Cool Whip instead of real meringue for a super casual version, though it won’t torch the same way.
Mini versions work great too. Use muffin tins instead of a big bowl, making individual servings that are easier to manage and portion. Kids especially love having their own personal dome of ice cream cake. You can also make a simpler loaf pan version that’s less intimidating to assemble and easier to slice evenly. The concept stays the same—cake on bottom, ice cream in the middle, meringue on top—but the scale becomes way more manageable for a regular weeknight celebration.
Bringing back Baked Alaska isn’t about being fancy or impressing people with complicated techniques. It’s about remembering that some desserts are worth a little extra effort, especially when most of that effort happens days before anyone even shows up. Plus, there’s something really satisfying about pulling off a recipe that intimidates most people. Your dinner guests don’t need to know how easy it actually was.
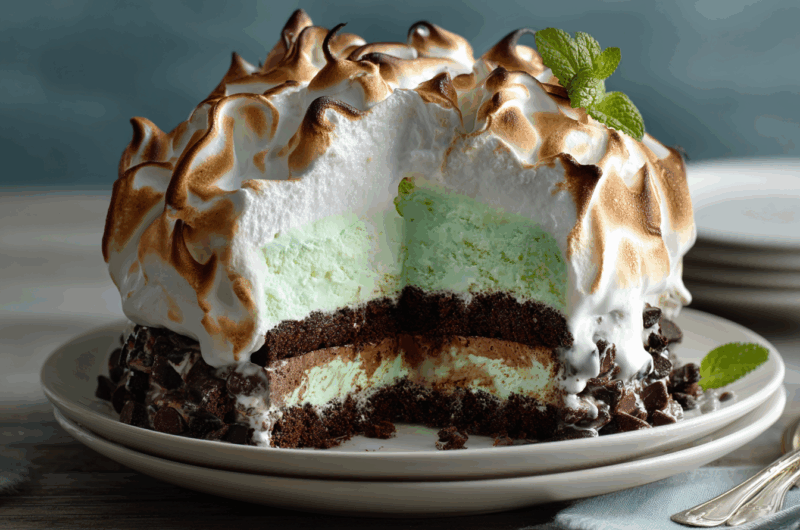
Grasshopper Baked Alaska
Course: Dessert RecipesCuisine: American Recipes8
servings30
minutes5
minutes425
kcalThis stunning retro dessert combines mint chocolate chip ice cream, chocolate cake, and toasted meringue into one unforgettable showstopper that’s completely make-ahead.
Ingredients
1 quart mint chocolate chip ice cream, slightly softened
1 quart chocolate ice cream, slightly softened
1 prepared chocolate pound cake (about 10 ounces), cut into 1/2-inch slices
6 large egg whites, room temperature
1/2 teaspoon cream of tartar
1/4 teaspoon salt
3/4 cup granulated sugar
1 teaspoon vanilla extract
1/4 teaspoon peppermint extract
Directions
- Line a 2-quart metal bowl with plastic wrap, leaving several inches of overhang on all sides. Working quickly, spread the mint chocolate chip ice cream evenly into the bowl, pressing firmly to eliminate air pockets and create a smooth layer about 1 inch thick. Place in freezer for 30 minutes until firm to the touch.
- Remove bowl from freezer and spread chocolate ice cream over the mint layer, again pressing firmly and smoothing the top. The ice cream should fill the bowl almost completely, leaving just enough room for the cake layer. Return to freezer for another 30 minutes.
- Arrange pound cake slices over the ice cream to create a flat base, trimming pieces as needed to fit snugly and cover the surface completely. Fold the plastic wrap over the cake to seal everything in. Freeze for at least 4 hours or overnight until completely solid throughout.
- When ready to add meringue, beat egg whites, cream of tartar, and salt in a large bowl with an electric mixer on medium speed until soft peaks form. Gradually add sugar, one tablespoon at a time, beating on high speed until stiff, glossy peaks form and sugar is completely dissolved, about 5-7 minutes. Beat in vanilla and peppermint extracts until just combined.
- Unwrap the frozen dessert and invert it onto an oven-safe serving plate, removing the bowl and peeling away all plastic wrap. Working quickly while dessert is still frozen solid, spread meringue over the entire surface, making sure to seal it completely to the plate edges with no ice cream showing through. Create decorative peaks and swirls with the back of a spoon or offset spatula.
- Preheat oven to 500°F. Place dessert on middle rack and bake for 3-5 minutes, watching constantly, until meringue peaks turn golden brown. Alternatively, use a kitchen torch to brown the meringue, keeping the flame moving constantly and holding it several inches away from the surface.
- Remove from oven and serve immediately, slicing with a knife dipped in hot water for clean cuts. The dessert will begin to soften after about 10 minutes at room temperature.
- If not serving right away after adding meringue, return the covered dessert to the freezer for up to 3 days, then brown the meringue just before serving.
Notes
- You can substitute any ice cream combinations you prefer. Classic vanilla, strawberry and chocolate also work beautifully.
- The entire dessert including meringue can be frozen for up to 3 days before the final baking step, making this perfect for entertaining.
- Make sure egg whites contain no traces of yolk and your mixing bowl is completely grease-free, or the meringue won’t whip properly.
- For individual servings, use muffin tins instead of a large bowl and adjust baking time to 2-3 minutes.
Frequently asked questions about Baked Alaska
Q: Can I really freeze the meringue without it getting weird and watery?
A: Yes, as long as everything is frozen solid before baking. The key is making sure the meringue completely seals the ice cream with no gaps. When properly frozen, the meringue actually protects the ice cream during baking and holds up great in the freezer for several days.
Q: What happens if I don’t have a kitchen torch?
A: The oven method works just as well. Just preheat to 500°F and watch it carefully for 3-5 minutes until the peaks turn golden. The high heat browns the outside quickly before the inside can melt. Some people actually prefer this method because it browns everything evenly.
Q: Can I use store-bought meringue or Cool Whip instead of making it from scratch?
A: Cool Whip won’t torch or bake the same way, but it works for a casual no-bake version if you skip the browning step entirely. Store-bought meringue powder mixed according to package directions works fine and saves time. The texture will be slightly different but still tasty.
Q: How far ahead can I make this before serving?
A: You can assemble the ice cream and cake layers up to a week ahead, then add the meringue and bake up to 3 days before serving. The final browning step should happen right before serving for the best texture and presentation, though frozen browned meringue holds for about a day.