Back in the 1970s, when Robert Redford was Hollywood’s golden boy and women’s magazines ruled kitchen counters everywhere, one dessert captured hearts faster than the actor himself. The “Next Best Thing to Robert Redford” dessert became legendary not just for its cheeky name, but because it delivered on its bold promise with layers of creamy, chocolatey goodness that made people swoon.
Why this dessert earned such a bold name
The name wasn’t just marketing genius – it was pure 1970s confidence. Family Circle magazine helped popularize this recipe during Robert Redford’s peak heartthrob years, when movies like “The Way We Were” had audiences swooning. The dessert needed a name that matched its irresistible appeal, and comparing anything to Robert Redford was the ultimate compliment of the era.
What makes this dessert truly special isn’t just the nostalgia factor. This layered creation has earned over 100 different names throughout the decades, from “Chocolate Lush” to “Better Than Sex Dessert,” proving its staying power. The recipe survived because it delivers exactly what it promises – pure indulgence that’s surprisingly easy to make.
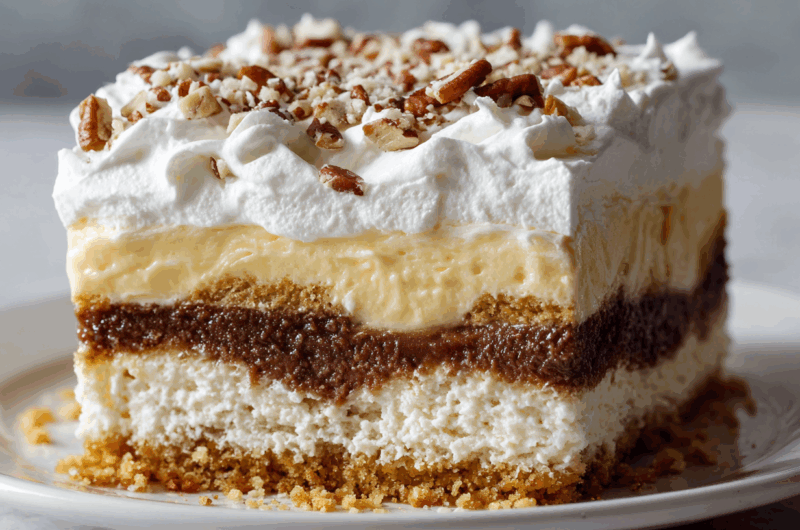
Four perfect layers make all the difference
This isn’t your average sheet cake or simple pudding – it’s an architectural marvel of dessert engineering. The bottom layer starts with a buttery pecan shortbread crust that’s pressed into a 13×9 pan and baked until golden. This creates the perfect sturdy foundation that won’t get soggy under all those creamy layers above.
Layer two brings the luxury with cream cheese, powdered sugar, vanilla, and Cool Whip whipped into cloud-like perfection. The third layer combines both chocolate fudge and vanilla instant pudding for complexity that keeps people guessing. Finally, the top gets crowned with more whipped topping and chocolate shavings for a finish that looks as good as it tastes.
Cool Whip makes this recipe foolproof
Here’s where 1970s convenience meets modern practicality. The original recipe calls for Cool Whip, and there’s good reason to stick with it instead of trying to be fancy with fresh whipped cream. Cool Whip holds its shape better, doesn’t weep or separate after hours in the fridge, and creates the exact texture this dessert is famous for.
The recipe originally called for 12-ounce containers of Cool Whip, but most stores now carry 8-ounce sizes. Two containers work perfectly – use one full container mixed into the cream cheese layer, and spread the second container on top. Some people prefer using less on the final layer, which leaves room for personal preference without ruining the recipe’s balance.
Pecans beat walnuts every single time
While the recipe technically allows for walnuts, pecans create the superior crust experience. Their buttery richness complements the sweet layers above without competing for attention. The key is chopping them finely enough to press into an even crust, but not so fine that they turn into powder and lose their texture.
When making the crust, mix 1¼ cups flour with 10 tablespoons melted butter and 1 cup finely chopped pecans until the mixture feels like wet sand. Press this firmly into your greased 13×9 pan – really press it down hard. Bake at 350°F for 20-25 minutes until the edges turn golden brown, then let it cool completely before adding the next layer.
Powdered sugar prevents grainy disasters
The cream cheese layer can make or break this dessert, and the secret weapon is powdered sugar instead of granulated. Regular sugar doesn’t dissolve completely in cream cheese, leaving behind a grainy texture that ruins the smooth, luxurious mouthfeel this dessert is famous for. Powdered sugar melts seamlessly into the mixture.
Beat 8 ounces of softened cream cheese with 1 cup powdered sugar and 1 teaspoon vanilla until completely smooth. This takes about 2-3 minutes with an electric mixer. Then fold in one container of Cool Whip gently – don’t overmix or the whipped topping will deflate. Spread this mixture carefully over the cooled crust, trying not to disturb the pecan base.
Two pudding varieties create complex richness
Don’t skip the double pudding layer – this is what separates amateur attempts from the real deal. Using both chocolate fudge and vanilla instant pudding creates depth that single-flavor versions can’t match. The vanilla brightens the chocolate while the chocolate adds richness to the vanilla, creating something entirely new.
Whisk one 5.1-ounce package of vanilla instant pudding with one 5.9-ounce package of chocolate fudge instant pudding and 3 cups of cold milk. Whisk vigorously for about 2 minutes until the mixture thickens considerably. Work quickly to spread this over the cream cheese layer before it sets up too firm. The pudding will continue thickening in the refrigerator.
Overnight chilling creates perfect texture
Patience pays off with this dessert more than almost any other. While it’s technically ready after 2 hours in the refrigerator, overnight chilling transforms it from good to legendary. The layers have time to meld slightly while still maintaining their distinct identities, and the crust softens just enough to cut cleanly without crumbling.
Cover the finished dessert tightly with plastic wrap, pressing it directly onto the surface of the final whipped topping layer. This prevents a skin from forming and keeps everything fresh. The dessert actually improves over the first day or two, making it perfect for make-ahead entertaining. Some families even prefer it after three days when all the layers have completely settled together.
Chocolate shavings finish like a professional
The final garnish might seem optional, but it’s what transforms this from a home kitchen dessert to something that looks bakery-worthy. Use a sharp vegetable peeler along the edge of a room-temperature semi-sweet chocolate bar to create perfect curls. Cold chocolate will break into chunks, while too-warm chocolate will create muddy smears.
Sprinkle the chocolate shavings just before serving, not hours ahead. Add extra chopped pecans around the edges if desired, but keep the center focused on those beautiful chocolate curls. Cut into squares with a sharp knife, wiping the blade clean between cuts to maintain neat edges that show off all four distinct layers.
Serving secrets that prevent messy disasters
This dessert requires a spoon, not a fork, despite looking like it should be fork-friendly. The creamy layers don’t hold together like cake, and trying to eat it with a fork results in frustrated guests and messy plates. Provide dessert spoons and small plates, and watch people savor every layered bite properly.
Cut portions slightly smaller than typical sheet cake squares – this dessert is incredibly rich and a little goes a long way. A 13×9 pan easily serves 16 people with generous portions, or stretches to 20 for smaller servings. Keep any leftovers covered in the refrigerator where they’ll stay fresh for up to four days, though they rarely last that long once people discover what they’re missing.
This vintage dessert proves that some things never go out of style, especially when they’re this delicious. Whether Robert Redford himself would approve remains a mystery, but generations of home cooks have declared it worthy of his legendary status. Make it once, and it’ll become your go-to impressive dessert that everyone begs for the recipe.
Next Best Thing to Robert Redford Dessert
Course: DessertCuisine: American16
servings20
minutes25
minutes477
kcalThis legendary 1970s layered dessert features a buttery pecan crust topped with cream cheese, dual pudding layers, and whipped topping for pure vintage indulgence.
Ingredients
1¼ cups all-purpose flour
10 tablespoons butter, melted
1 cup finely chopped pecans
8 ounces cream cheese, softened
1 cup powdered sugar
1 teaspoon vanilla extract
16 ounces whipped topping (2 8-ounce containers), like Cool Whip
5.1 ounces vanilla instant pudding mix
5.9 ounces chocolate fudge instant pudding mix
3 cups cold milk
¼ cup grated semi-sweet chocolate bar for garnish
Directions
- Preheat oven to 350°F and coat a 13×9-inch baking dish with nonstick cooking spray. In a medium mixing bowl, combine flour, melted butter, and chopped pecans until well combined and crumbly. Press the mixture firmly into the prepared baking dish, making sure to create an even layer.
- Bake the crust for 20 to 25 minutes, or until lightly golden brown around the edges. Remove from oven and set aside to cool completely before adding the next layer. This prevents the cream cheese layer from melting when spread on top.
- In a separate bowl, use an electric mixer to beat cream cheese, powdered sugar, and vanilla extract until completely smooth, about 2-3 minutes. Gently fold in 1 container of Cool Whip, being careful not to overmix and deflate the whipped topping. Spread this mixture evenly over the cooled crust.
- In a clean bowl, whisk both the vanilla and chocolate pudding mixes with 3 cups cold milk. Whisk vigorously for about 2 minutes until the mixture is smooth and thickened. Work quickly to spread the pudding mixture over the cream cheese layer before it sets up too firm.
- Spread the remaining container of Cool Whip evenly over the pudding layer, creating the final topping. Cover the dish tightly with plastic wrap, pressing it directly onto the surface to prevent a skin from forming. Refrigerate for at least 2 hours, but preferably overnight for best texture.
- Just before serving, create chocolate shavings by running a sharp vegetable peeler along the edge of a room-temperature semi-sweet chocolate bar. Sprinkle the chocolate shavings over the top along with additional chopped pecans if desired. Cut into squares using a sharp knife, wiping the blade clean between cuts.
Notes
- If you can find 12-ounce containers of Cool Whip, use half for the cream cheese layer and half for the topping
- This dessert is very rich – cut smaller portions than typical sheet cake squares
- Serve with spoons rather than forks for the best eating experience
- Leftovers keep covered in the refrigerator for up to 4 days and actually improve in texture
- Walnuts can be substituted for pecans, but pecans provide superior buttery richness
Frequently asked questions
Q: Can I make this dessert ahead of time for a party?
A: Absolutely! This dessert actually improves with time and is perfect for make-ahead entertaining. You can make it up to 3 days in advance and keep it covered in the refrigerator. The layers meld together beautifully while still maintaining their distinct textures. Just add the chocolate shavings right before serving to keep them looking fresh.
Q: What happens if I use fresh whipped cream instead of Cool Whip?
A: While you can substitute fresh whipped cream, Cool Whip is really the way to go for this recipe. Fresh whipped cream tends to weep and deflate over time, especially when layered with other ingredients. Cool Whip holds its shape and texture much better, which is essential for maintaining those beautiful distinct layers that make this dessert so special.
Q: Why does my cream cheese layer look lumpy or grainy?
A: This usually happens when the cream cheese isn’t fully softened or when granulated sugar is used instead of powdered sugar. Make sure to take the cream cheese out of the refrigerator at least an hour before making the recipe, and always use powdered sugar which dissolves completely. Beat the mixture for a full 2-3 minutes until completely smooth before folding in the Cool Whip.
Q: Can I change up the pudding varieties or use different combinations?
A: While the classic version uses vanilla and chocolate fudge pudding, you can experiment with other combinations like pistachio and vanilla, or butterscotch and chocolate. However, the dual-pudding approach is what creates the complex richness this dessert is famous for, so avoid using just one variety if you want the authentic experience that made this recipe legendary.