Most people think making apple pie from scratch requires an entire afternoon of rolling dough and peeling endless apples. What if there was a way to create an absolutely amazing apple pie in just over an hour? This recipe started when a 14-year-old named Annie challenged her grandmother to create a faster version because her mom got frustrated with three-hour baking sessions. The result is a game-changing approach that delivers all the homemade taste without the marathon effort.
Why store-bought crust actually works better
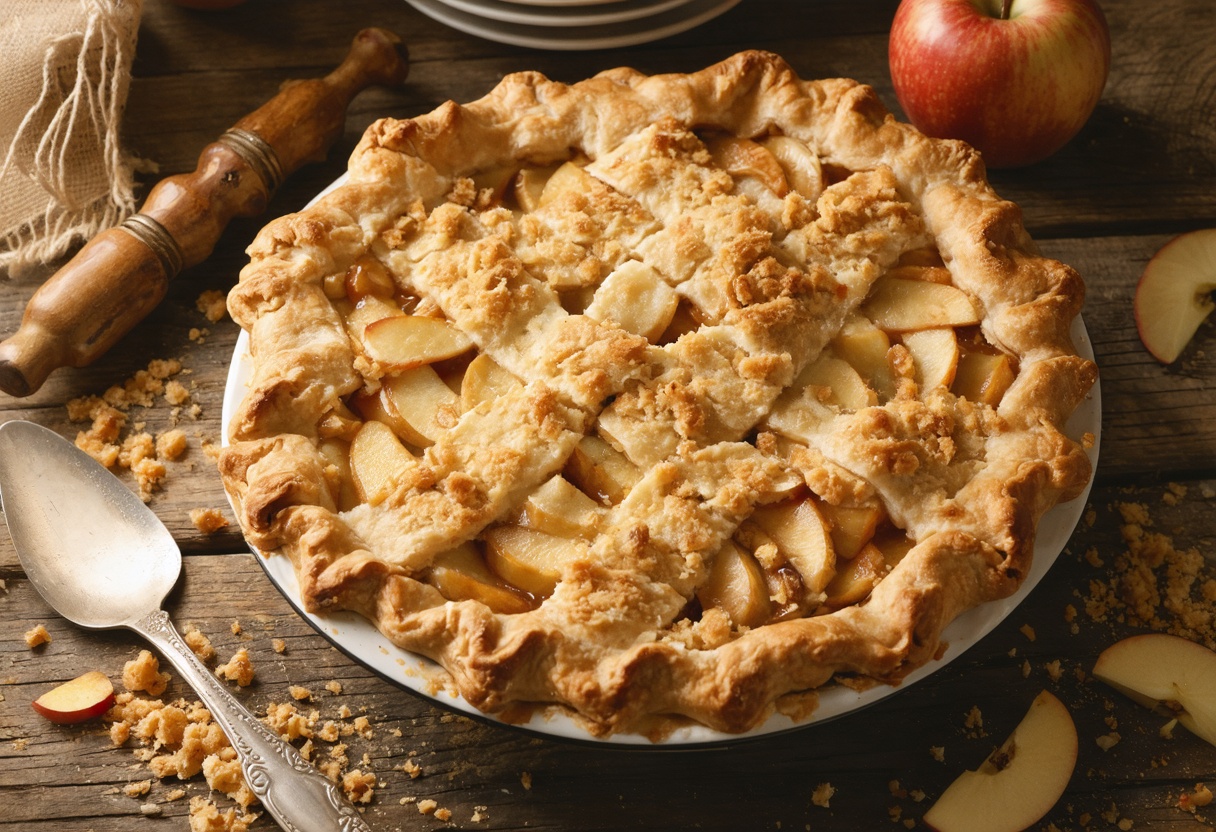
The biggest time-saver comes from using refrigerated pie crust, but not just any way. Most people make the mistake of using it straight from the package, which screams “store-bought.” The secret lies in treating that convenient crust like it deserves respect. Remove it from the fridge 15 minutes early, then take time to properly press it into the pan and create a beautiful crimped edge.
Professional bakers actually recommend Pillsbury refrigerated crusts because they consistently deliver reliable results. The trick is adding a thin layer of butter to the pie pan before placing the crust, then taking time to create that quarter-inch lip around the edges. This prevents filling from bubbling over and creates the same professional look as homemade pastry. When done right, even experienced bakers can’t tell the difference.
The five-minute apple peeling method that changes everything
Traditional apple peeling with a paring knife takes forever and creates uneven results. Professional kitchens use Y-shaped peelers instead of small knives because they remove wider strips in less time. Start by twisting off the stem, then slice across the top with the peeler. Work from top to bottom in wide strips, rotating as needed.
This technique allows most people to peel five medium apples in under five minutes, compared to 15-20 minutes with traditional methods. The Y-peeler also works perfectly for other vegetables like butternut squash and potatoes. After peeling, slice each apple by cutting off the four “cheeks” around the core, then slice those pieces thin. Professional techniques like these transform tedious prep work into quick, manageable tasks that anyone can master.
Which apples create the perfect pie texture
Many people assume the best eating apples make the best pie apples, but that’s completely wrong. Delicious snacking varieties often turn to mush during baking, leaving you with apple sauce instead of distinct slices. The key is choosing apples that hold their shape during the 40-minute baking time while developing the right level of tenderness.
Honey Crisp, Jonagold, Golden Delicious, and Braeburn varieties deliver consistently excellent results. These apples maintain their structure while becoming perfectly tender. Surprisingly, popular baking choice Granny Smith often stays too firm for this particular recipe’s timing. Professional food magazines like Bon Appétit also recommend Mutsu, Winesap, and Pink Lady varieties. The ideal approach involves using 5-6 medium apples or 6-7 cups of thinly sliced fruit for optimal texture and distribution.
The three-ingredient crumb topping secret
Traditional crumb toppings require cutting cold butter into flour mixtures, which creates mess and takes considerable effort. This simplified version uses partially melted butter instead, creating the same tender crumbs with much less work. Microwave half a cup of butter for 40-50 seconds until it’s about three-quarters melted, then mix with flour, brown sugar, cinnamon, and salt.
Light brown sugar produces better results than either granulated sugar or dark brown sugar. Regular sugar creates harder crumbs, while dark brown can make the finished pie look burnt rather than golden. The mixture should form large, wet crumbs that hold together when squeezed. Professional testing shows this method produces the same tender, buttery topping as traditional techniques while requiring half the effort and cleanup time.
Temperature timing that prevents disasters
The biggest mistake people make involves forgetting to reduce oven temperature after placing the pie inside. Start by preheating to 425°F with a foil-lined sheet pan on the lower rack. This catches any drips and provides even heat distribution. Place the assembled pie on this sheet pan, then immediately reduce temperature to 375°F.
Baking takes 40-45 minutes total, but check after 35 minutes for excessive browning. Some ovens run hot and may require foil covering to prevent burning. The pie is done when the crumb topping turns golden brown and apple filling bubbles slightly through the cracks. Professional bakers know that internal bubbling indicates the apples have released their juices and the flour has thickened properly. Allow 45-60 minutes cooling time before serving to let the filling set completely.
Make-ahead strategies for busy schedules
Busy families can prepare components in advance without sacrificing quality. The crumb topping stores perfectly in the refrigerator for up to three days, actually improving in texture as flavors meld. Prepared pie crusts can be fitted into pans and frozen for weeks, eliminating last-minute prep work during hectic dinner preparations.
Complete pies freeze beautifully after cooling completely. Wrap tightly and freeze for up to three months, then thaw at room temperature for several hours before reheating. Warm frozen pies at 300°F for 20 minutes to restore that fresh-baked taste and texture. Some families prepare multiple pies during apple season, storing them for quick desserts throughout fall and winter months. This approach provides homemade desserts with minimal daily effort.
Essential tools that speed up the process
The right equipment makes dramatic differences in preparation speed and final results. A Y-shaped peeler costs under $10 but cuts apple prep time by two-thirds compared to paring knives. Standard 9-inch pie pans work better than deep-dish versions for this recipe, providing proper crust-to-filling ratios and even baking.
Glass, metal, or ceramic pie pans all work well, though glass allows visual monitoring of bottom crust browning. A large mixing bowl accommodates all the sliced apples comfortably, while a medium microwave-safe bowl handles crumb topping preparation. Sheet pans lined with foil catch drips and prevent oven cleanup nightmares. These basic tools, most already found in typical kitchens, eliminate common frustrations and streamline the entire process significantly.
Serving suggestions that make it special
Vanilla ice cream remains the classic pairing, but timing matters more than people realize. Serve pie while still slightly warm, allowing the ice cream to soften against the tender apples and buttery crumb topping. Cold pie with ice cream creates temperature contrast without the magical melding that occurs with warm desserts.
Heavy cream or whipped cream provides lighter alternatives for those preferring less richness. Some families enjoy sharp cheddar cheese with apple pie, a traditional combination that balances sweetness with savory notes. Recipe testing shows this particular pie holds up beautifully to various accompaniments because the sturdy crumb topping and well-seasoned filling complement rather than compete with additional elements. Coffee or tea makes perfect beverage pairings for casual family dinners or special occasions.
Common mistakes that ruin good intentions
Skipping the crust preparation steps creates the most obvious “store-bought” appearance and taste. Simply unrolling dough into the pan without proper pressing and crimping results in shrinkage and poor presentation. Another major error involves adding wet crumb topping directly without the brief chilling period that helps it hold together during baking.
Overpacking apples into the pie creates uneven cooking and potential overflow issues. The fruit should mound slightly in the center but not pack tightly together. Forgetting to reduce oven temperature after placing the pie inside causes rapid browning and potential burning before the interior cooks properly. Finally, cutting into hot pie creates runny filling that hasn’t had time to set properly. These simple mistakes turn excellent recipes into disappointing results, but they’re easily avoided with proper attention to details.
This streamlined approach proves that exceptional apple pie doesn’t require all-day commitment or professional pastry skills. With smart shortcuts and proven techniques, anyone can create impressive homemade desserts that bring families together around the dinner table. The next time apple pie sounds appealing but time feels short, remember that one hour stands between craving and satisfaction.
Annie’s Easy Apple Pie
Course: DessertCuisine: American10
servings40
minutes40
minutes366
kcalA delicious homemade-tasting apple pie that takes just over an hour to make using smart shortcuts and professional techniques.
Ingredients
1 refrigerated pie crust (Pillsbury recommended)
1 teaspoon soft butter
½ cup butter (1 stick)
1 cup all-purpose flour
¾ cup light brown sugar, packed
½ teaspoon ground cinnamon
⅙ teaspoon kosher salt
5 medium apples (Honey Crisp or Jonagold)
½ cup granulated sugar
Directions
- Remove pie crust from refrigerator 15 minutes before using. Preheat oven to 425°F and place a foil-lined sheet pan on the lower rack. Lightly butter a 9-inch pie pan, then unroll the crust and center it without stretching. Press firmly against sides and bottom, leaving ½-inch overhang.
- Tuck the overhanging crust under about ¼-inch around the entire pan, creating a lip that extends ¼-inch above the rim. Use your fingers to crimp this edge decoratively. This prevents filling overflow and creates a professional appearance. Refrigerate the prepared crust while making the filling.
- Place ½ cup butter in a medium microwave-safe bowl and microwave for 40-50 seconds until about ¾ melted. Add flour, brown sugar, cinnamon, and salt, stirring with a fork until large wet crumbs form. If mixture seems too wet, add 1-2 tablespoons extra flour. Refrigerate while preparing apples.
- Using a Y-shaped peeler, remove apple stems and peel in wide strips from top to bottom, rotating as needed. Cut off the four “cheeks” around each core, then slice these pieces thinly. This technique peels all 5 apples in under 5 minutes and creates uniform slices.
- Combine sliced apples with granulated sugar, 3 tablespoons flour, and remaining cinnamon in a large bowl. Toss gently until apples are evenly coated. The flour will thicken the juices during baking while sugar balances the apple’s natural tartness.
- Remove the chilled pie crust from refrigerator and add the seasoned apple mixture, mounding slightly in the center. Don’t pack too tightly as apples need space to cook evenly. The slight mound compensates for settling during baking.
- Sprinkle the chilled crumb topping evenly over the apples, breaking up any large clumps with your fingers. Keep the topping within the crimped edges to prevent burning. The contrast between tender apples and buttery crumbs creates the signature texture.
- Place pie on the preheated sheet pan and immediately reduce oven temperature to 375°F. Bake 40-45 minutes until topping is golden brown and filling bubbles through the crumbs. Check after 35 minutes and cover with foil if browning too quickly. Cool 45-60 minutes before serving to allow filling to set properly.
Notes
- Use a standard 9-inch pie pan, not deep-dish, for best results with this recipe
- Pillsbury refrigerated pie crusts work excellently and are recommended by Cook’s Illustrated
- Light brown sugar creates better crumb texture than granulated or dark brown sugar
- Y-shaped peelers dramatically reduce apple prep time compared to paring knives
- Pie can be frozen after cooling completely and reheated at 300°F for 20 minutes
Frequently asked questions
Q: Can I use a deep-dish pie pan instead of a regular 9-inch pan?
A: This recipe is specifically designed for standard 9-inch pans to ensure proper crust-to-filling ratios and even baking. Deep-dish pans may result in undercooked crusts or uneven apple texture.
Q: What happens if I forget to reduce the oven temperature after putting the pie in?
A: The high heat will brown the topping too quickly while leaving the apples undercooked. If this happens, immediately lower temperature to 375°F and cover with foil to prevent burning.
Q: Can I make the crumb topping ahead of time?
A: Yes, the crumb topping actually improves when made up to 3 days in advance. Store it covered in the refrigerator and the texture will be even better than fresh-made.
Q: Why do my apples turn to mush instead of staying in slices?
A: This usually happens when using soft eating apples like Red Delicious or Gala. Stick to firmer varieties like Honey Crisp, Jonagold, or Braeburn that hold their shape during baking.