The humble fried egg is a breakfast staple, yet there’s a world of difference between an average egg and one that makes you pause after the first bite. What if I told you that the secret to extraordinary eggs requires no fancy equipment or rare ingredients? The technique that professional chefs rely on—the butter basting method—can be mastered in your kitchen this morning.
Why most home cooks get fried eggs wrong
Many home cooks approach fried eggs with the wrong technique. They crack cold eggs directly into a barely heated pan, use too little fat, and cook them at high temperatures. This rushed approach leads to rubbery whites with burned edges and inconsistently cooked yolks. When eggs cook too quickly or unevenly, you miss out on developing the rich, complex flavors that make restaurant eggs so satisfying.
Professional chefs understand that perfect eggs require patience and proper fat. They use medium-low heat and take their time, allowing the proteins in the egg whites to set gently while the yolks remain creamy. The key factor many home cooks overlook is the importance of having the right fat in the pan—not just for preventing sticking but for flavor development.
The butter basting technique
The secret technique that elevates ordinary fried eggs to restaurant quality is surprisingly simple: butter basting. This method, championed by renowned chef Gordon Ramsay, involves cooking eggs in a combination of olive oil and butter, then using the melted, foaming butter to baste the egg whites as they cook. The process creates a perfect harmony of textures—crispy edges with tender whites and a perfectly runny yolk—while infusing the eggs with rich, nutty flavor.
To execute this technique properly, start with a medium-low heat setting. Add a tablespoon of olive oil to your pan, followed by a tablespoon of butter. The oil prevents the butter from burning while the butter provides that irreplaceable flavor. As the butter begins to foam, gently add your room-temperature eggs to the pan. The key moment comes next: tilt the pan slightly to pool the foaming butter mixture, then use a spoon to repeatedly scoop the hot butter over the whites of the eggs.
This basting action serves multiple purposes. It helps cook the top surface of the egg whites without flipping them, enhances the flavor by bathing the eggs in butter, and creates those coveted crispy edges while maintaining a tender center. The gentle heat ensures the yolks warm through without solidifying, resulting in that ideal, golden flow when broken.
The right pan makes all the difference
Most professional chefs recommend using either a high-quality non-stick pan or a well-seasoned cast iron skillet. Non-stick pans provide easy egg release and cleanup, making them ideal for everyday cooking. They also heat quickly and distribute heat evenly. For the butter-basting technique, a non-stick pan with slightly sloped sides makes it easier to tilt and collect the butter for basting.
Cast iron skillets offer superior heat retention and can create beautifully crispy edges on your eggs. The size of your pan matters too—for one or two eggs, an 8-inch pan is ideal, large enough to give the eggs room but small enough to keep the butter and oil mixture sufficiently deep for effective basting.
The fat factor: butter and oil combination
While you can use butter or oil alone, the magic happens when you combine them. Butter contains milk solids that impart incomparable flavor but can burn at relatively low temperatures. Olive oil has a higher smoke point and helps prevent the butter from burning while contributing its own subtle flavor notes.
For optimal results, use European-style butter with a higher fat content. This type of butter foams beautifully when heated, creating the perfect medium for basting. The olive oil should be a good quality extra virgin variety for best flavor. Use equal parts butter and oil, typically about a tablespoon of each for two eggs.
Temperature control is critical
Temperature control is the unsung hero of perfect fried eggs. Too hot, and your eggs develop tough, rubbery whites with burned edges before the centers are properly set. Too cool, and they become flat and lifeless. The ideal temperature for the butter-basting method is medium-low, which translates to about 275-300°F.
Give your pan at least 2-3 minutes to come up to temperature before adding any fat. You can test if your pan is ready by flicking a tiny drop of water onto the surface; it should dance and evaporate fairly quickly. Once you add the butter and oil, wait until the butter is fully melted and starting to foam before adding your eggs.
Watch for visual cues during cooking: the whites should set gradually from the edges inward, taking about 2 minutes total. If they’re setting almost immediately upon hitting the pan, your heat is too high. The butter should maintain a gentle foam throughout cooking, not brown or burn.
Seasoning strategies for next-level eggs
Salt and pepper form the foundation, but when and how you apply them matters. For the butter-basting method, either season the butter-oil mixture in the pan before adding the eggs, allowing the seasonings to infuse into the fat, or season the eggs directly about 30 seconds before they finish cooking. Avoid salting too early, as salt can break down the proteins in the egg whites, resulting in a watery texture.
Beyond the basics, consider infusing your basting butter with aromatics. Smashed garlic cloves, fresh herb sprigs like thyme or rosemary, or a small shallot slice added to the butter as it melts will perfume the fat with complex flavors that transfer to the eggs. Smoked paprika added to the butter creates a bacon-like flavor without the meat. Toasted cumin seeds provide an earthy warmth that pairs beautifully with the richness of the yolk.
Additions that transform basic eggs
While the butter-basting technique alone will transform your fried eggs, strategic additions can elevate them even further. Briefly sauté minced garlic or shallots in your butter-oil mixture until fragrant but not browned, then proceed with the egg cooking. The aromatic compounds permeate the fat, which then transfers these flavors to your eggs during the basting process.
Another game-changing addition is frying your eggs in chili crisp or infused oils. The spicy, crunchy bits in chili crisp create textural contrast and heat that cuts through the richness of the yolk. For an unexpected twist, try basting your eggs with a teaspoon of cream added to the butter—it creates an almost custard-like quality in the whites.
Timing and doneness preferences
For sunny-side up eggs using the butter-basting technique, a perfectly runny yolk with fully set whites typically takes 2-3 minutes total. The hot fat basted over the whites helps them set without having to flip the egg, preserving that beautiful golden yolk.
For those who prefer over-easy eggs, after the whites have mostly set (about 2 minutes), gently flip the egg using a thin, wide spatula. Allow it to cook for just 10-15 seconds on the second side—just enough to create a thin film over the yolk while keeping it runny within. Over-medium eggs require about 30 seconds after flipping, while over-hard eggs need 1-1.5 minutes after flipping.
Alternative fats to try
While the butter-oil combination forms the foundation of the basting technique, exploring alternative fats can lead to fascinating flavor discoveries. Bacon fat lends smoky depth and a savory quality that regular butter can’t match. To use bacon fat for basting, cook bacon in your pan first, then remove the bacon and proceed with your eggs in the rendered fat.
Another exciting option is infused butter. Compound butters with herbs, citrus zest, or spices can transform your morning eggs with minimal effort. For an international twist, try ghee (Indian clarified butter), which offers a nutty, caramelized flavor along with a higher smoke point, making it ideal for the basting technique.
Troubleshooting common problems
The most common problem is eggs that stick to the pan, which usually indicates insufficient fat or improper preheating. Ensure you’re using a full tablespoon each of butter and oil for two eggs and allow your pan to preheat properly before adding any fat.
Another frequent issue is whites that spread too thinly in the pan. Always let your eggs come to room temperature for at least 5-10 minutes before cooking. If you’re in a hurry, place them in a bowl of warm (not hot) water for a few minutes. Adding the eggs when the butter is actively foaming helps set the whites quickly, preventing excessive spreading.
To prevent broken yolks, crack eggs into a small bowl or ramekin first, then gently slide them into the pan rather than cracking directly over hot fat. This allows you to inspect for shell fragments and ensures gentler handling.
The butter-basting technique transforms ordinary fried eggs into something extraordinary. With proper fat selection, temperature control, and that magical basting action, you can create eggs with perfectly set whites, runny golden yolks, and crispy, flavorful edges that rival those served at high-end brunch restaurants. This method proves that often the simplest techniques, executed with care, yield the most impressive results in the kitchen.
Perfect Butter-Basted Fried Eggs
Course: BreakfastCuisine: American2
servings5
minutes3
minutes220
kcalThis simple chef-inspired technique transforms ordinary eggs into restaurant-quality creations with crispy edges and silky, rich yolks.
Ingredients
2 large eggs, at room temperature
1 tablespoon unsalted butter (preferably European-style)
1 tablespoon extra virgin olive oil
¼ teaspoon kosher salt
Freshly ground black pepper, to taste
Optional: ¼ teaspoon red pepper flakes
Optional: 1 small clove garlic, smashed
Optional: 1 sprig fresh herbs (thyme, rosemary, or sage)
Optional: flaky sea salt for finishing
Directions
- Take your eggs out of the refrigerator at least 5-10 minutes before cooking to bring them to room temperature. If you’re in a hurry, place the eggs (still in their shells) in a bowl of warm (not hot) water for 2-3 minutes. Room temperature eggs spread less in the pan and cook more evenly.
- Heat an 8-inch non-stick or well-seasoned cast iron skillet over medium-low heat for 2-3 minutes. The pan is ready when a drop of water sizzles gently when flicked onto the surface. Proper preheating ensures the eggs won’t stick and allows for even cooking.
- Add the olive oil and butter to the pan, along with any optional aromatics like garlic or herb sprigs. If using, this is also the time to add red pepper flakes. Allow the butter to melt completely and begin foaming, which indicates it’s hot enough to cook the eggs properly.
- Crack each egg into a small bowl or ramekin first, rather than directly into the pan. This allows you to check for shell fragments and ensures gentler handling of the yolks. Carefully slide the eggs into the hot butter-oil mixture, keeping the yolks intact.
- Sprinkle the eggs with salt and freshly ground black pepper. The salt should be added now, not too early (which can break down the whites) or too late (which prevents it from properly seasoning the eggs). The heat from the eggs will activate the pepper’s aromatic compounds.
- After the egg whites begin to set around the edges (about 30 seconds), tilt the pan slightly to pool the butter-oil mixture to one side. Using a spoon, repeatedly scoop the hot butter over the egg whites, focusing on the area around the yolks. Continue basting for about 1-2 minutes until the whites are set but the yolks remain runny.
- Monitor the doneness by gently shaking the pan. The whites should be completely set with no translucent areas, while the yolks should still have a slight jiggle. The eggs are done when the edges are crispy and golden brown, with the remainder of the whites fully set but not rubbery.
- Using a thin, wide spatula, carefully transfer the eggs to a warmed plate. If desired, sprinkle with flaky sea salt for a finishing touch. Serve immediately while the contrast between the crispy edges and runny yolk is at its peak. Remove any aromatics like garlic or herb sprigs before serving.
Notes
- For over-easy eggs, cook the eggs as directed above until the whites are mostly set, then gently flip with a thin spatula and cook for 10-15 seconds on the second side.
- The combination of butter and oil is key – butter provides rich flavor while oil prevents burning. Don’t substitute with just one fat.
- Temperature control is critical. If your butter starts to brown or burn, your heat is too high. The butter should foam, not brown.
- Experiment with alternative fats like bacon fat, ghee, or duck fat for different flavor profiles.
- For extra flavor, try adding a splash of soy sauce or fish sauce to the butter-oil mixture, or experiment with spice blends like za’atar or smoked paprika.
Frequently Asked Questions About Butter-Basted Fried Eggs
Q: Why do my eggs stick to the pan even when using this method?
A: If your eggs are sticking, there are three likely culprits. First, your pan might not be properly preheated—always give it 2-3 minutes over medium-low heat before adding fat. Second, you might not be using enough fat—for two eggs, you need a full tablespoon each of butter and oil. Third, your nonstick surface might be worn out or your cast iron pan might not be properly seasoned. In this case, consider replacing your nonstick pan or re-seasoning your cast iron skillet.
Q: Can I make butter-basted eggs ahead of time for meal prep?
A: Butter-basted eggs are best enjoyed immediately after cooking when the contrast between crispy edges and runny yolk is perfect. However, if you need to meal prep, cook the eggs until the yolks are medium or hard (fully set), then cool completely before refrigerating. Reheat gently in the microwave for 15-20 seconds. The texture won’t be the same as freshly made, but they’ll still be flavorful. Alternatively, prepare all your other meal prep components and cook fresh eggs just before eating.
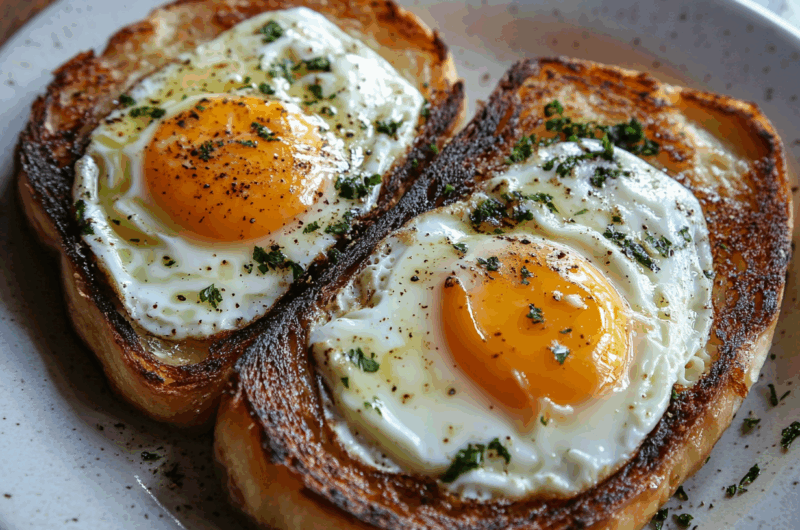
Q: What are some creative ways to serve butter-basted eggs beyond just toast?
A: Butter-basted eggs are incredibly versatile! Try them on grain bowls with roasted vegetables and a drizzle of tahini sauce; on top of crispy hash browns with avocado and hot sauce; crowning a bowl of creamy polenta with sautéed greens; nestled into a warm tortilla with black beans and salsa for breakfast tacos; or on a bed of garlicky yogurt with toasted pine nuts and za’atar for a Middle Eastern-inspired breakfast. They’re also excellent on burgers, served over stir-fried rice, or added to ramen just before serving.
Q: Is there a way to make this recipe dairy-free without losing the rich flavor?
A: Yes! For a dairy-free version with similar richness, replace the butter with additional olive oil plus 1-2 teaspoons of nutritional yeast for umami flavor. Another excellent option is using ghee (which has milk solids removed and is often tolerated by those with dairy sensitivities) or duck fat, which provides exceptional richness and crispy edges. Avocado oil combined with a tiny splash of toasted sesame oil can also create a rich flavor profile without dairy. The key is using a fat with character rather than a neutral oil like vegetable or canola oil.