When time is short but your hunger is real, the microwave sitting on your counter might be the secret weapon for perfect eggs you never knew you needed. Most of us reach for a pan when cooking eggs, assuming it’s the only proper way. But what if I told you that your microwave can produce delicious eggs in a fraction of the time, with less cleanup and surprisingly good results? Whether you’re rushing to get out the door or simply want to simplify your cooking routine, mastering microwave egg techniques might revolutionize your breakfast game.
Why microwaving eggs actually works
Contrary to what cooking purists might say, microwaving eggs isn’t just a shortcut—it’s a legitimate cooking method with its own merits. Microwaves cook food by exciting water molecules, creating heat through friction. Since eggs contain significant moisture, they respond well to microwave cooking. The microwave heats the entire egg simultaneously rather than from the outside in, which means eggs can cook more evenly in less time when done correctly.
Understanding the right technique makes all the difference in microwave egg success. Many people have tried microwaving eggs once, had them explode or turn out rubbery, and sworn off the method forever. But with proper preparation—like piercing yolks before cooking, using the right container, and controlling cooking power—microwave eggs can rival their stovetop counterparts in both texture and taste.
Essential equipment for microwave egg mastery
Before diving into microwave egg cooking, having the right tools will set you up for success. The most important item is a microwave-safe container with sufficient depth. Ceramic mugs work exceptionally well for single eggs, while wider bowls are better for scrambles or omelets. Glass containers also work well, but avoid using plastic unless specifically labeled as microwave-safe.
Covers or lids are non-negotiable when microwaving eggs. A microwave-safe plate, paper towel, or plastic wrap with a corner lifted can work as a makeshift lid. The cover prevents messy splatters and helps trap some steam, which aids in more even cooking. If using plastic wrap, be sure to leave a small vent by folding back one corner to prevent pressure buildup.
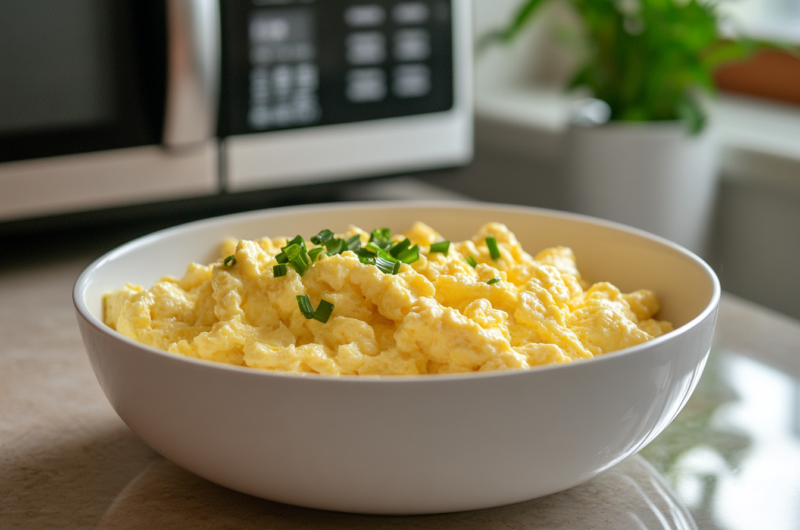
Scrambled eggs in 60 seconds flat
Microwave scrambled eggs might be the easiest entry point into egg microwaving. Start with two large eggs in a microwave-safe mug or bowl that’s at least twice the volume of the eggs themselves. Beat the eggs thoroughly until the whites and yolks are completely combined. For extra fluffiness, add a tablespoon of milk or water, which creates steam and helps the eggs rise. Season with salt and pepper before cooking.
For best results, microwave the beaten eggs on high for 30 seconds, then remove and stir them well. This interruption in cooking prevents uneven heating and helps create those soft curds that make scrambled eggs so delicious. Return the eggs to the microwave for another 30 seconds, then check again. Perfect microwave scrambled eggs should be just set but still slightly moist, as they’ll continue cooking for a few moments after removal.
Poached eggs without the fuss
Poached eggs have a reputation for being difficult to master, but the microwave simplifies the process dramatically. Start with a microwave-safe mug or small bowl filled halfway with water. The water should be hot but not boiling—about a minute in the microwave should do it. Adding a few drops of white vinegar to the water helps the egg whites coagulate faster, though this step is optional.
Crack a fresh, cold egg directly into the hot water, being careful not to break the yolk. Some cooks find success with cracking the egg into a small dish first, then gently sliding it into the hot water. Cover the container with a microwave-safe plate or paper towel. Cook the egg on medium power (around 50-70%) for 60 seconds initially, then check its progress. Continue microwaving in 10-15 second increments until the white is fully set but the yolk remains soft. A perfectly poached microwave egg should have firm whites and a runny, warm yolk.
Omelets made simple in your microwave
Microwave omelets offer the flavor of a restaurant breakfast with minimal effort and cleanup. Begin with two to three eggs in a microwave-safe bowl with a flat bottom—the wider the bowl, the thinner your omelet will be. Beat the eggs thoroughly, then add a tablespoon of milk or water for fluffiness. Season with salt, pepper, and any dried herbs you enjoy.
Start by microwaving the egg mixture uncovered on high for one minute. The edges should start to set while the center remains somewhat liquid. Use a spatula to gently pull the cooked edges toward the center, allowing the uncooked egg to flow to the edges. Cover and continue microwaving in 30-second intervals until the omelet is mostly set but still slightly moist on top. For fillings, pre-cook any raw vegetables or meats before adding them to your omelet. After the initial cooking minute, sprinkle your chosen fillings over half of the partially-set eggs, along with some shredded cheese. Continue cooking until the eggs are fully set and the cheese has melted.
Microwave mug quiches for protein on the go
Microwave mug quiches offer a convenient way to enjoy a protein-packed meal with minimal preparation. Start with a large microwave-safe mug sprayed with cooking spray. Two eggs whisked with a tablespoon of milk or cream form the base. For a crust-like texture, press a layer of crushed crackers into the bottom of your mug before adding the egg mixture.
Fillings can include pre-cooked vegetables like spinach, mushrooms, or bell peppers, and proteins such as diced ham or crumbled bacon. Cheese adds flavor and creamy texture—keep fillings to no more than ¼ cup total to prevent overflow. Cover your mug loosely with a paper towel and microwave on high for about 1 minute 30 seconds. Check for doneness by inserting a knife into the center—it should come out mostly clean. Let the quiche rest for one minute before eating, as it will continue to set up.
Avoiding common microwave egg pitfalls
Exploding eggs rank as the number one complaint about microwave egg cooking. These mini-explosions happen when steam builds up inside the egg with nowhere to escape. Always pierce egg yolks before cooking, using a toothpick, fork, or knife. For scrambled eggs, thorough beating eliminates this risk. Never microwave eggs in their shells under any circumstances, as they will explode violently.
Rubbery texture is another common issue that can make microwaved eggs unappetizing. This usually results from overcooking or using too high a power setting. Cooking eggs in the microwave works best at reduced power—70-80% is ideal for most egg preparations. Cook eggs in short intervals, checking frequently and stirring when appropriate. Remove eggs from the microwave just before they look completely done, as they’ll continue cooking from residual heat.
Uneven cooking frustrates many beginners. Eggs might be fully cooked on the edges but still liquid in the center. The solution is interrupting the cooking process to redistribute the heat. For scrambled eggs, stir after every 30-second interval. For omelets, pull the cooked edges toward the center to allow uncooked egg to flow outward.
Flavor boosters for microwave eggs
Herbs and spices transform basic microwave eggs into gourmet treats with minimal effort. Fresh herbs like chives, basil, dill, or cilantro add bright flavors and should be mixed in after cooking. Dried herbs and spices work well when whisked into eggs before cooking—try classics like oregano, thyme, or paprika. The microwave’s quick cooking time makes bold seasonings especially important, as there’s less time for flavors to develop.
Cheese varieties can take microwave eggs from ordinary to extraordinary. Hard cheeses like cheddar, Swiss, or Parmesan should be finely grated for faster melting. For scrambled eggs, add the cheese halfway through cooking or just after cooking while the eggs are still hot. Soft cheeses like goat cheese or cream cheese work beautifully when dolloped into the egg mixture before cooking.
For more substantial microwave egg dishes, incorporate pre-cooked or quick-cooking vegetables and proteins. Finely diced bell peppers, spinach, and tomatoes can go in raw, while harder vegetables should be pre-cooked or very finely chopped. For protein beyond the egg itself, try diced ham, crumbled bacon, or rotisserie chicken. Keep portions small and evenly distributed throughout the egg mixture for proper cooking.
Cleanup hacks for microwave egg cooking
Preventative measures significantly reduce cleanup when cooking eggs in the microwave. Always use cooking spray or a light coat of butter on your container before adding eggs. Cover your container during cooking with a microwave-safe lid, paper towel, or splatter guard. For added protection, place a paper towel under your cooking container to catch any overflow or drips.
Don’t let egg splatters dry on microwave surfaces or containers, as they become increasingly difficult to remove over time. For stuck-on egg, fill containers with warm water and a drop of dish soap immediately after use. Cleaning your microwave promptly prevents hardened egg from becoming a stubborn problem.
For microwave interiors with dried egg residue, try steam cleaning. Fill a microwave-safe bowl with equal parts water and white vinegar, then microwave on high for 3-5 minutes until the mixture produces steam. The acidic steam loosens dried egg particles, making them easy to wipe away with a damp cloth. For stubborn spots, leave the steamy microwave closed for an additional 5 minutes before wiping.
Microwaving eggs might seem unconventional, but with the right techniques, it’s a game-changing method for quick, delicious meals. Whether you’re making scrambled eggs, poached eggs, omelets, or quiches, the microwave offers speed and convenience without sacrificing flavor. By understanding the science, using the right equipment, and avoiding common pitfalls, you can master microwave egg cooking and add these techniques to your culinary repertoire. Next time you’re craving eggs but short on time, skip the stovetop and give your microwave a chance to impress you.
Perfect Microwave Scrambled Eggs
Course: BreakfastCuisine: American4
servings30
minutes40
minutes300
kcalMaster the art of making deliciously fluffy scrambled eggs in your microwave in under two minutes with no skillet to clean!
Ingredients
2 large eggs
1 tablespoon milk or water
Salt and pepper, to taste
2 tablespoons shredded cheese (optional)
1 teaspoon butter or cooking spray
Fresh herbs like chives or dill (optional)
Directions
- Choose a microwave-safe mug or bowl that’s at least twice the volume of the eggs. This extra space is crucial as eggs expand while cooking and can easily overflow. Coat the inside of your container with cooking spray or a small amount of butter to prevent sticking and make cleanup easier.
- Crack two large eggs directly into your prepared container. Add one tablespoon of milk or water, which creates steam during cooking and helps produce fluffier eggs. Season with salt and pepper or your favorite seasoning blend. Using a fork, beat the eggs thoroughly until the whites and yolks are completely combined and the mixture has a uniform color.
- Cover your container loosely with a microwave-safe plate, paper towel, or microwave splatter guard. This prevents mess while still allowing some steam to escape. Microwave the beaten eggs on high power (100%) for 30 seconds. The edges should just be starting to set while the center remains mostly liquid.
- Remove the eggs from the microwave and stir thoroughly with a fork, breaking up any large curds that have formed and redistributing the mixture. This interruption in cooking prevents uneven heating and helps create the soft, small curds that make scrambled eggs delicious. Make sure to scrape down the sides of the container where eggs may have started to set.
- Return the eggs to the microwave and cook for another 20-30 seconds. Watch closely as cooking times can vary significantly depending on your microwave’s wattage. The eggs are done when they’re mostly set but still look slightly moist on top, as they’ll continue cooking for a few moments after removal from the microwave.
- If adding cheese, sprinkle it over the hot eggs immediately after removing them from the microwave. The residual heat will melt the cheese without overcooking the eggs. For extra creaminess, you can also stir in a small spoonful of cream cheese at this point.
- Let the eggs rest for about 15 seconds before eating, as they’ll firm up slightly during this time. If using fresh herbs, sprinkle them over the top now. Taste and adjust seasoning if needed with additional salt and pepper. The eggs should be light, fluffy, and evenly cooked with small, tender curds.
- Enjoy your eggs directly from the cooking container for minimal cleanup, or transfer to a plate or toast for a complete breakfast. These microwave scrambled eggs are perfect for busy mornings, dorm room cooking, or office lunches when you need a quick protein boost without access to a full kitchen.
Notes
- The size of your container matters significantly. Use one that’s about twice the volume of your raw eggs to prevent overflow.
- If your eggs turn out rubbery, try reducing the cooking time or microwave power to 70-80% for the second interval.
- For lower wattage microwaves (700w or less), you may need to add 10-15 seconds to each cooking interval.
- Always err on the side of slightly undercooking your eggs, as they’ll continue to cook from residual heat after removing from the microwave.
- For larger portions, you can double the recipe but will need to adjust cooking times and use a larger container.
Frequently Asked Questions About Microwave Eggs
Q: Is it safe to cook eggs in the microwave?
A: Yes, it’s completely safe to cook eggs in the microwave when done properly. The microwave heats the eggs to the same food-safe temperature as traditional cooking methods. The key safety concerns are preventing explosions (by always piercing yolks and never microwaving eggs in shells) and ensuring the eggs reach 160°F to kill any potential bacteria. Using the proper equipment and technique makes microwave egg cooking both safe and convenient.
Q: Why do my microwave eggs always explode or turn out rubbery?
A: Explosions happen when steam builds up inside the egg with nowhere to escape. Always pierce yolks before cooking and beat eggs thoroughly for scrambled preparations. Rubbery texture typically results from overcooking or using too high power. Try reducing cooking time, lowering the power setting to 70-80%, and cooking in shorter intervals with stirring in between. Removing eggs from the microwave when they’re still slightly moist helps too, as they’ll continue cooking from residual heat.
Q: Can I make other egg dishes besides scrambled eggs in the microwave?
A: Absolutely! The microwave is versatile for egg cooking. You can make poached eggs by cooking them in hot water, omelets by using a flat-bottomed container and adding fillings halfway through cooking, and mug quiches by mixing eggs with fillings and cooking until set. You can also prepare “fried” egg patties for breakfast sandwiches by cooking a whole egg (with pierced yolk) in a small round container. Each style requires slightly different techniques but all can be successfully prepared in the microwave.
Q: How do I clean egg explosions from my microwave?
A: For egg messes in the microwave, clean them promptly before they harden. Fill a microwave-safe bowl with equal parts water and white vinegar (about a cup of each), then microwave on high for 3-5 minutes until the mixture produces steam. Keep the microwave door closed for an additional 5 minutes—the acidic steam will loosen dried egg particles, making them easy to wipe away with a damp cloth. For prevention, always cover your container during cooking and pierce yolks before microwaving.