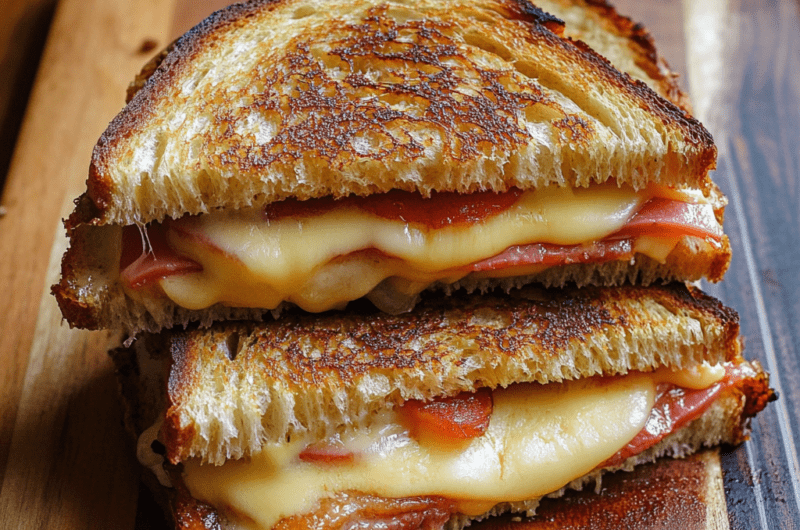
Ah, the grilled cheese sandwich – a comfort food classic that’s been warming hearts and satisfying cravings for generations. But what if we told you that you’ve been making this beloved staple all wrong? Don’t worry, we’re not here to crush your culinary dreams. Instead, we’re about to embark on a cheesy journey that will elevate your grilled cheese game to new heights. From unconventional ingredients to mind-blowing techniques, get ready to transform this simple sandwich into a gourmet masterpiece that will make your taste buds dance with joy.
The Bread Breakthrough
Let’s start with the foundation of any great grilled cheese: the bread. You might think any old slice will do, but you’d be sorely mistaken. The key to a perfect grilled cheese lies in choosing the right bread and preparing it properly. Forget about grabbing that fresh loaf from the bakery – day-old bread is your new best friend. Why? It holds together better when grilled, preventing the dreaded soggy sandwich syndrome.
But here’s where it gets interesting. If you’re planning to add wet ingredients like tomato slices, give your bread a quick toast before assembling your sandwich. This creates a moisture barrier, ensuring your grilled cheese stays crispy, not soggy. And when it comes to thickness, less is more. Thinner slices cook faster, allowing your cheese to melt evenly without burning the bread.
Want to take your bread game to the next level? Consider investing in a high-quality cast iron griddle. These versatile kitchen tools distribute heat evenly, ensuring your bread achieves that perfect golden-brown crispiness on the outside while maintaining a soft, pillowy interior.
Tip: For an extra flavor boost, try rubbing a clove of fresh garlic on the outside of your bread before buttering. This simple step will transform your sandwich into a garlic bread grilled cheese hybrid that’s simply irresistible.
Now, let’s talk about that butter. You might be tempted to melt it in the pan, but resist that urge! Room temperature butter spread directly on the bread is the way to go. It ensures even coverage and helps achieve that perfect golden crust we all crave. And don’t be shy – a generous layer of butter is essential for that rich, indulgent flavor.
But here’s a controversial twist that might just change your life: mayonnaise. Yes, you read that right. Some grilled cheese aficionados swear by spreading a thin layer of mayo on the outside of the bread instead of butter. It browns beautifully and adds a subtle tangy flavor that complements the cheese perfectly. Don’t knock it until you’ve tried it!
Cheese Choices: The Meltdown
Now, onto the star of the show: the cheese. If you’ve been reaching for those pre-sliced singles, it’s time for an intervention. The secret to an epic grilled cheese lies in choosing high-quality cheeses that melt like a dream. But here’s the kicker – you don’t have to limit yourself to just one type!
Mixing cheeses is where the magic happens. Try combining a sharp cheddar with a creamy Gruyère for a complex flavor profile that will make your taste buds sing. Or go for a blend of mozzarella and provolone for that perfect stretchy pull. The possibilities are endless, and experimenting with different combinations is half the fun!
But here’s a pro tip that will change your cheese game forever: grate your cheese. Yes, it’s an extra step, but trust us, it’s worth it. Grated cheese melts more evenly and faster than sliced cheese, ensuring that every bite is perfectly gooey. Plus, it allows you to create a more even distribution of cheese throughout your sandwich.
Tip: For the ultimate cheese experience, try using a high-quality box grater. It makes quick work of even the hardest cheeses and ensures uniform shreds for optimal melting.
Another game-changing move? Bring your cheese to room temperature before cooking. This simple step helps it melt faster and more evenly, preventing the dreaded cold cheese center. And while we’re on the subject of temperature, let’s talk about cooking heat. The key to a perfect melt is medium-low heat. It might take a bit longer, but it allows the cheese to melt completely without burning the bread.
If you’re feeling adventurous, why not try adding some unconventional ingredients to your cheese blend? A sprinkle of fresh herbs, a dash of smoked paprika, or even a drizzle of honey can take your grilled cheese from ordinary to extraordinary. Don’t be afraid to get creative – after all, that’s what great cooking is all about!
Beyond the Basics: Elevating Your Grilled Cheese
Now that we’ve mastered the basics, it’s time to take your grilled cheese to the next level. One word: fillings. Adding extra ingredients isn’t just about piling on more stuff – it’s about creating a harmonious flavor profile that complements your carefully chosen cheeses.
Think outside the box with additions like thinly sliced apples for a sweet crunch, or crispy bacon for a smoky twist. A spread of tomato jam can add a tangy depth of flavor, while caramelized onions bring a touch of sweetness. And for those who like it hot, a few slices of jalapeño can kick things up a notch.
But remember, balance is key. Too many fillings can overwhelm the cheese and make your sandwich difficult to eat. A good rule of thumb is to stick to one or two additional ingredients. And if you do go for wetter fillings like tomatoes, don’t forget that pre-toasting trick we mentioned earlier!
Tip: For a gourmet touch, try using a panini press to grill your sandwich. It creates beautiful grill marks and ensures even heating on both sides.
Now, let’s talk about the cooking process. If you find that your bread is browning too quickly but your cheese isn’t fully melted, here’s a pro move: transfer your sandwich to a 200°F oven for a few minutes. This gentle heat will melt the cheese without burning the bread. And if you’re worried about overstuffing, try this neat trick: place a plate on top of your sandwich, hold it, and flip the pan to slide the sandwich back in. It’s a foolproof way to keep everything together.
Finally, don’t forget about presentation. A perfectly grilled cheese is a thing of beauty, so why not show it off? Try cutting your sandwich diagonally for that classic look, or get fancy with a fun sandwich cutter for shapes that will delight kids and adults alike. And remember, the right accompaniments can take your grilled cheese experience to new heights. A creamy tomato soup for dipping, a crisp dill pickle on the side, or a fresh green salad can turn your sandwich into a complete meal.
There you have it – the secrets to making the most epic grilled cheese sandwich ever. From choosing the right bread and cheese to mastering the cooking technique and exploring exciting flavor combinations, you’re now equipped to create grilled cheese masterpieces that will wow your friends and family. So the next time someone tells you it’s just a simple sandwich, you can smile knowingly, because you know the truth: a perfectly crafted grilled cheese is nothing short of culinary art. Now go forth and grill with confidence – your taste buds will thank you!
The Ultimate Grilled Cheese Sandwich
Course: Main CourseCuisine: American2
servings10
minutes10
minutes450
kcal20
minutesDiscover the secrets to creating the most epic grilled cheese sandwich you’ve ever tasted, with perfectly crispy bread and gooey melted cheese in every bite.
Ingredients
4 slices of day-old sourdough bread
2 oz sharp cheddar cheese, grated
2 oz Gruyère cheese, grated
2 tablespoons salted butter, softened
1 clove garlic, peeled
1 teaspoon Dijon mustard (optional)
2 slices of tomato (optional)
2 slices of cooked bacon (optional)
1 tablespoon mayonnaise (optional, for spreading on bread)
Directions
- Begin by preparing your ingredients. Grate the cheddar and Gruyère cheeses and set aside. If using tomato or bacon, have these ready as well. Ensure your butter is at room temperature for easy spreading.
- If you’re using the garlic bread variation, rub one side of each bread slice with the peeled garlic clove. This will infuse the bread with a subtle garlic flavor. If you’re using mayonnaise instead of butter, spread a thin layer on one side of each bread slice.
- Spread butter (or mayonnaise) on one side of each bread slice. If using Dijon mustard, spread a thin layer on the unbuttered side of two bread slices. This adds a tangy flavor that complements the cheese.
- Preheat your skillet or griddle over medium-low heat. While it’s heating, assemble your sandwiches. On the unbuttered side of two bread slices, layer half of the grated cheese mixture. If using tomato and/or bacon, add these on top of the cheese. Finish with the remaining cheese and top with the other bread slices, buttered side up.
- Carefully place the sandwiches in the preheated skillet. Cook for about 3-4 minutes, or until the bottom is golden brown and the cheese starts to melt. Keep an eye on the heat – if the bread is browning too quickly, lower it slightly.
- Using a spatula, carefully flip the sandwiches and cook for another 2-3 minutes, or until the second side is golden brown and the cheese is fully melted. If the bread is browning too quickly but the cheese isn’t fully melted, cover the skillet with a lid to trap the heat and help the cheese melt.
- Once both sides are golden brown and the cheese is gooey and melted, remove the sandwiches from the skillet. Let them rest for a minute – this allows the cheese to set slightly and makes the sandwich easier to cut and eat.
- Cut the sandwiches diagonally and serve immediately. For the ultimate comfort food experience, serve alongside a bowl of tomato soup for dipping. Enjoy your perfectly crafted, epic grilled cheese sandwich!
Notes
- For the best results, use day-old bread. It holds up better during cooking and creates a crispier exterior.
- Experiment with different cheese combinations to find your favorite flavor profile. Just make sure to use cheeses that melt well.
- If you’re adding wet ingredients like tomatoes, consider toasting the bread lightly before assembling the sandwich to prevent sogginess.
- For an extra indulgent twist, try brushing the outside of the bread with garlic butter instead of plain butter.
- Remember, low and slow is the key to perfectly melted cheese and golden-brown bread. Don’t rush the process by cranking up the heat!
Frequently Asked Questions
Q: Can I use pre-sliced cheese instead of grating my own?
A: While you can use pre-sliced cheese, grating your own is recommended for better melting and even distribution. Pre-sliced cheese often contains anti-caking agents that can affect its melting properties. Freshly grated cheese will give you that perfect, gooey melt every time.
Q: Is it really necessary to use day-old bread?
A: While not absolutely necessary, day-old bread is ideal for grilled cheese sandwiches. It has a slightly firmer texture that holds up better during cooking and creates a crispier exterior. If you only have fresh bread, you can lightly toast it before assembling your sandwich to achieve a similar effect.
Q: Can I make a vegan version of this grilled cheese sandwich?
A: Absolutely! There are many great vegan cheese alternatives available that melt well. Look for brands specifically designed for melting. You can also use vegan butter or olive oil instead of dairy butter. The cooking process remains the same, but you might need to adjust the cooking time slightly depending on how your vegan cheese melts.
Q: How can I prevent my grilled cheese from becoming soggy when adding tomatoes?
A: To prevent sogginess when adding tomatoes, try these tips: 1) Lightly toast the bread before assembling the sandwich. 2) Place the cheese directly against the bread and put the tomato slices in the middle. 3) Remove excess moisture from the tomato slices by patting them with a paper towel before adding them to the sandwich. These steps will help maintain the crispy texture of your grilled cheese while still enjoying the added flavor of tomatoes.