We’ve all been there – staring at a plate of Brussel sprouts, memories of past bitter experiences threatening to make us push the plate away. But wait, before you give up on these little green gems, read on. With a touch of culinary magic, you can transform them into a dish even the biggest skeptics will adore.
Demystifying the Bitterness of Brussel Sprouts
It’s no secret that some folks find Brussel sprouts a tad too bitter. This can often be chalked up to genetics or even the very nature of the sprout itself. Over the years, there’s been a noticeable change in the taste of Brussel sprouts, making them less bitter. The good news? They aren’t genetically modified! Instead, this change can be attributed to breeding programs aimed at enhancing their flavor profile.
Tip: Choosing younger, smaller sprouts will often result in a milder and sweeter flavor.
However, even with this advancement in sprout breeding, preparation remains key. A classic way to prepare them is to clean, halve (depending on size), boil for 11 minutes, and then immediately place them in an ice water bath. This method retains their bright green color and reduces their bitterness.
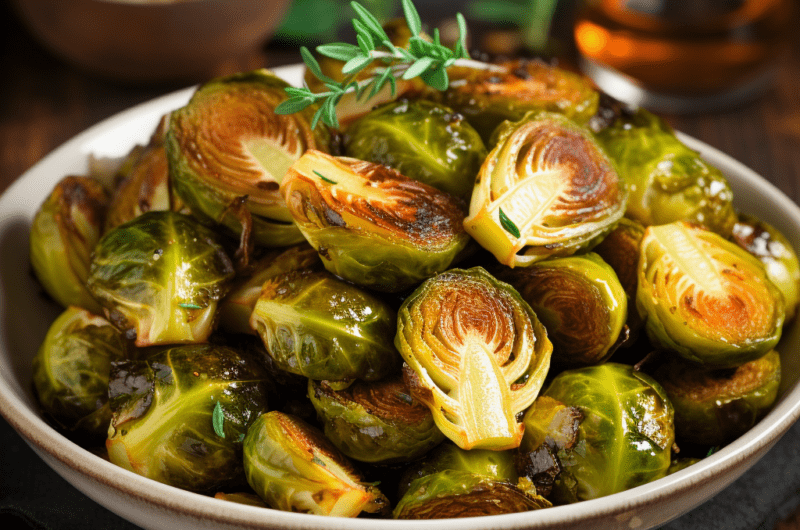
Roasting Your Way to Perfection
One can’t emphasize enough the transformative power of roasting when it comes to Brussel sprouts. If you’ve been avoiding this vegetable due to past traumatic boiled Brussel sprout experiences, roasting will make you a convert. The trick to perfect roasting is the oil. Ensure that your sprouts have a nice, shiny coat of oil. A quality olive oil is a game changer here, not just for roasting but for enhancing the taste.
Tip: For an extra burst of flavor, try seasoning with kosher salt or infusing your oil with herbs before roasting.
Once your sprouts are cleaned, halved, and bathed in olive oil, they’re ready for the oven. The result? Crispy on the outside, tender on the inside, and packed with a nutty flavor that’s nothing short of sensational.
Storing Sprouts: Keeping Freshness Intact
For those who buy in bulk or like to have their kitchen stocked, knowing how to store Brussel sprouts is vital. First things first, get rid of any yellowed or wilted leaves. Loose sprouts should be taken out of any cardboard containers and cellophane wrapping, examined for freshness, and then stored appropriately. The right storage method ensures your sprouts remain fresh, retaining their vibrant color and crunch for when you’re ready to cook them. For storage containers, opt for a quality airtight container, ensuring your veggies remain as fresh as the day you bought them.
Tip: Brussel sprouts, like many vegetables, release gases. Thus, storing them in an airtight container allows these gases to be trapped, preventing any unwanted odors in your fridge.
Also, consider the location of your sprouts in the refrigerator. The crisper drawer is ideal. Here, they’re shielded from the drying effects of the fridge’s fan, ensuring they stay plump and juicy.
So, next time you’re faced with a plate of Brussel sprouts, remember these tips and embrace the challenge. With a touch of effort and culinary flair, you’ll be feasting on a dish that’s not only delicious but packed with nutrients. It’s time to stop relegating Brussel sprouts to the ‘foods I avoid’ list and elevate them to their rightful place – the star of your dinner plate!
Roasted Brussels Sprouts
Course: Main CourseCuisine: European4
servings10
minutes25
minutes180
kcal35
minutesTransform your Brussels sprouts into a nutty-flavored, crispy delight.
Ingredients
500g Brussels sprouts, cleaned and halved
3 tbsp quality olive oil
Kosher salt to taste
Directions
- Preheat your oven to 400°F (200°C).
- In a mixing bowl, combine the Brussels sprouts with olive oil, ensuring they are evenly coated.
- Lay the Brussels sprouts on a baking sheet in a single layer. Sprinkle with kosher salt.
- Roast in the oven for about 20-25 minutes or until they are golden and crispy on the outside.
Notes
- For added flavor, infuse the olive oil with garlic or herbs before mixing with the Brussels sprouts.
- Smaller, younger sprouts are often milder and sweeter in taste.
- Roasting time may vary based on oven and size of sprouts, keep an eye on them to avoid burning.
Frequently Asked Questions
Q: Why are my Brussels sprouts still bitter even after roasting?
A: While roasting reduces bitterness, choosing younger, smaller sprouts also helps. Additionally, overcooking can make them more bitter, so ensure they’re roasted just until crispy.
Q: Can I use other oils instead of olive oil for roasting?
A: Yes, you can use other oils such as avocado oil or grapeseed oil. However, quality olive oil imparts a distinct flavor that enhances the Brussels sprouts.
Q: How do I store leftover roasted Brussels sprouts?
A: Store them in an airtight container in the fridge for up to 3 days. Reheat in the oven or on a skillet to retain crispiness.
Q: How long can I store fresh Brussels sprouts in the fridge?
A: In an airtight container, they can stay fresh for up to a week. Ensure they’re shielded from the drying effects of the fridge’s fan for best results.