There’s a cake your grandmother almost certainly made, and she probably made it in a cast-iron skillet. Pineapple upside down cake was everywhere in the 1950s — in magazines, at church potlucks, on kitchen tables after Sunday dinner. It wasn’t fancy. It wasn’t complicated. But it was the kind of dessert that made people feel taken care of, and that counted for a lot in a decade obsessed with both domestic perfection and convenience.
Here’s the thing though: this cake didn’t start out as humble comfort food. Back in the 1920s, pineapple was a trendy, almost exotic ingredient — think of it as the avocado of its era. Housewives saved it for company. It was glamorous. By the time the 1950s rolled around, canned pineapple was cheap and available at every grocery store, and the cake settled into its true identity: a homey, deeply American dessert that anyone could pull off on a Tuesday night. Mid-century food columnist Cecily Brownstone called it “that all American dessert, delightfully adaptable and always extremely popular.” She wasn’t wrong.
I think it deserves a serious comeback, and not in an ironic, retro-kitsch way. It deserves one because it’s genuinely good — caramelized, buttery, a little sticky, and dead simple to make if you understand a few key things about how it works.
How a Contest Made This Cake Famous
The pineapple upside down cake we know today owes its existence largely to a 1925 recipe contest. The Hawaiian Pineapple Company sponsored a call for pineapple recipes, and the judges came from Fannie Farmer’s School, Good Housekeeping, and McCall’s Magazine — basically the holy trinity of home cooking authority at the time. Out of 60,000 submissions, an astonishing 2,500 were recipes for pineapple upside down cake. That’s not a coincidence. People were already making these cakes, and the contest just blew the doors open.
The company was smart enough to run advertisements about the flood of recipes, which made even more people want to try it. By the 1930s, the cake had become so standard that one writer declared no woman could truly call herself a finished amateur baker until she’d made one. A little dramatic? Sure. But it tells you how deeply embedded this cake was in American baking culture.
Why Cast Iron Is the Only Pan That Makes Sense
Before reliable ovens were common in American homes, cakes were made in cast-iron skillets on the stovetop. That’s actually how upside down cakes got their start — they were originally called “skillet cakes,” and the term upside down cake didn’t appear until the late 1800s. But even after ovens became standard, the cast-iron skillet stuck around as the preferred vessel for this particular cake, and for good reason.
The heavy steel distributes heat evenly, which means the butter and brown sugar on the bottom caramelize into a gorgeous, sticky glaze instead of burning. And when it’s time to flip the cake out — that’s the whole dramatic moment, the upside down part — the skillet’s handle gives you something solid to grip. Try flipping a hot cake out of a flimsy round pan and you’ll understand instantly why grandma used her cast iron.
If you don’t own a cast-iron skillet, a 10-inch one will run you about $25 at Walmart or Target, and you’ll use it for everything else too. A 9-inch round cake pan works in a pinch, but the caramelization won’t be as even, and flipping is trickier. I’m opinionated about this: just get the skillet.
The Anatomy of a Perfect Pineapple Upside Down Cake
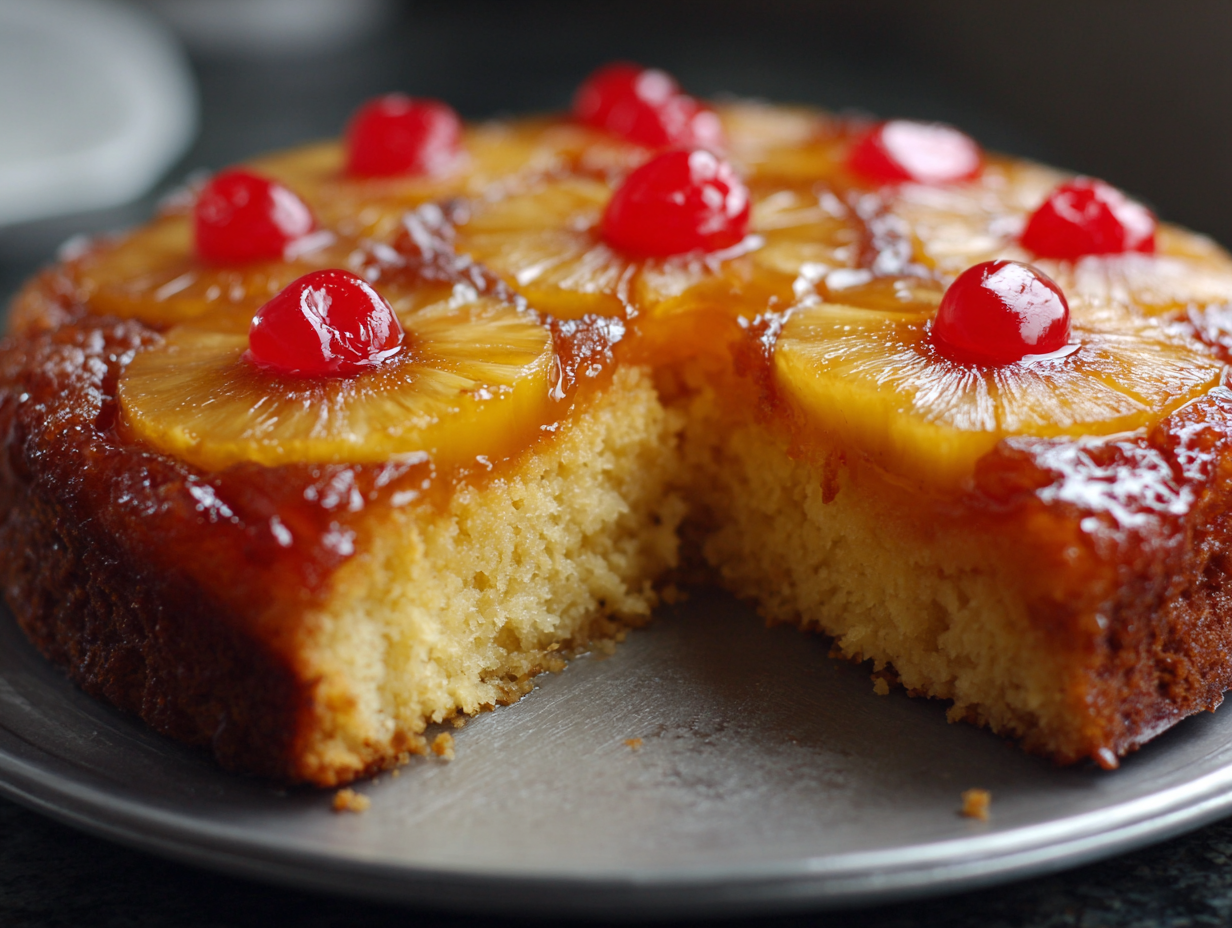
This cake has three layers, and they all work together. On the bottom of the pan (which becomes the top once you flip it), you melt butter and brown sugar together until they form a bubbling, toffee-like layer. Pineapple rings go down into that. Maraschino cherries nestle into the center of each ring — yes, this is mandatory, don’t skip it. Then cake batter goes on top, and the whole thing bakes until golden.
When you invert it onto a plate, the pineapple is on top, glistening with caramel, and the cake underneath is moist from all the fruit juice that soaked upward during baking. It’s a beautiful thing. The combination of butter, brown sugar, and pineapple creates something that tastes way more complex than the ingredient list suggests.
Use canned pineapple rings, not fresh. I know that sounds like cooking heresy in 2024, but hear me out: canned pineapple is already tender, uniformly sliced, and its juice won’t make the cake too wet or too acidic. Fresh pineapple contains an enzyme called bromelain that can mess with the cake’s texture. This is one of those rare cases where the canned version is actually better. Dole or store brand — doesn’t matter, just make sure they’re rings packed in juice, not syrup.
Common Mistakes and How to Avoid Them
The biggest mistake people make is not letting the cake cool long enough before flipping, or letting it cool too long. You want a sweet spot of about 5 minutes after it comes out of the oven. Any sooner and the caramel is still liquid and the cake might fall apart. Any longer and the caramel starts to harden and the pineapple will stick to the pan instead of releasing cleanly with the cake.
Another common problem: soggy cake. This happens when you don’t drain the pineapple rings well enough. Pat them dry with paper towels before laying them in the pan. Excess juice pooling under the fruit will steam the bottom of the cake and turn it gummy.
And please, don’t overbake. The cake should be golden on top (which is actually the bottom) and a toothpick inserted in the center should come out clean or with just a few moist crumbs. Overbaking dries out the crumb, and the whole point of this cake is that it’s supposed to be tender and a little bit lush.
Variations That Actually Work
The original upside down cakes weren’t even made with pineapple. Before canned pineapple existed, people used seasonal fruits like apples, cherries, and peaches. And honestly, all of those still work great. In the 1930s, recipes with peach and apricot were all over the place. If you want to try a peach version in summer when the stone fruit is good, go for it — just slice them about a quarter-inch thick and arrange them in the same caramel base.
Some people add a splash of dark rum to the butter and brown sugar mixture before adding the fruit. This is a very good idea and I encourage it. A tablespoon or two is plenty. It adds a warmth that pairs perfectly with the caramel.
You can also swap the yellow cake for something spiced. Add a teaspoon of cinnamon and half a teaspoon of ground ginger to the batter, and suddenly you’ve got something that feels autumnal and a little more interesting. I wouldn’t go as far as chocolate cake — that’s a bridge too far with pineapple — but a little spice is welcome.
Why This Cake Still Works in 2024
The 1950s were a strange time for American desserts. Betty Crocker’s Picture Cook Book dropped in 1950 and taught millions of people to bake. By 1951, Betty Crocker, Duncan Hines, and Pillsbury were all selling boxed cake mixes. TV dinners showed up in 1953. Convenience was king. Some of the desserts from that era — Jell-O molds with suspended vegetables, tomato soup cake — are rightfully collecting dust in history books. But pineapple upside down cake survived because it was never just a gimmick. It was never trying to be clever.
It’s a one-pan cake. You can have it in the oven in 15 minutes. It looks impressive when you flip it out — there’s a genuine little moment of suspense every time — and it tastes like butter and brown sugar and warm fruit. That’s not a trend. That’s just good baking.
And unlike something like Baked Alaska, which requires blowtorching meringue and timing everything perfectly so the ice cream doesn’t melt, this cake asks very little of you. Melt butter, add sugar, arrange fruit, pour batter, bake, flip. That’s it. If your grandmother could do it after a full day of keeping a house running in 1956, you can do it on a Sunday afternoon with a podcast on.
Make it once and I promise you’ll understand why 2,500 people submitted their version to a single recipe contest a hundred years ago. Some things are popular for a reason.
Frequently Asked Questions
Q: Can I use a boxed cake mix instead of making the batter from scratch?
A: Absolutely. A standard yellow cake mix from Betty Crocker or Duncan Hines works just fine. Prepare it according to the box directions and pour it right over the pineapple layer. The from-scratch version has a slightly better texture, but the boxed version is how plenty of grandmothers made it in the 1950s, and nobody complained.
Q: How do I store leftover pineapple upside down cake?
A: Cover it tightly with plastic wrap or slide it into an airtight container and keep it at room temperature for up to 2 days. After that, refrigerate it for up to 5 days. The caramel topping can get a little sticky in the fridge, so let it come to room temperature for about 20 minutes before serving, or warm individual slices in the microwave for 15 seconds.
Q: What size skillet do I need?
A: A 10-inch cast-iron skillet is the standard. It fits 7 pineapple rings perfectly — one in the center and six around it. A 12-inch skillet is too big and the cake will be too thin. If you only have a 9-inch, you can make it work but you may need to cut a ring or two to fit.
Q: Can I make this cake ahead of time for a party?
A: You can bake it up to a day ahead. Flip it out of the skillet after the 5-minute rest, let it cool completely, then cover it gently. It actually tastes great at room temperature, so you don’t need to reheat it. Just don’t refrigerate it if you’re serving it the same day — cold caramel loses that soft, sticky quality that makes this cake special.
8
servings15
minutes45
minutes380
kcalA sticky, caramelized, old-school cake made in a cast-iron skillet just like grandma used to make in the 1950s.
Ingredients
1/3 cup (5 tablespoons) unsalted butter for the topping
2/3 cup packed dark brown sugar
1 (20 oz) can pineapple rings in juice, drained and patted dry (reserve 2 tablespoons juice)
7-8 maraschino cherries, drained
1 1/2 cups all-purpose flour
1 1/2 teaspoons baking powder
1/4 teaspoon salt
3/4 cup granulated sugar
1/3 cup unsalted butter, softened, for the cake batter
2 large eggs, room temperature
1 teaspoon vanilla extract
1/2 cup whole milk, room temperature
Directions
- Preheat your oven to 350°F. Place the 1/3 cup of butter for the topping in a 10-inch cast-iron skillet and set it in the oven for a few minutes until the butter is completely melted. Remove the skillet carefully — it will be hot.
- Sprinkle the dark brown sugar evenly over the melted butter in the skillet. Use a fork or the back of a spoon to spread it into a uniform layer. Don’t stir it into the butter — just let it sit on top so it melts into a caramel during baking.
- Arrange the drained pineapple rings on top of the brown sugar. Place one ring in the center and surround it with the remaining rings. Place a maraschino cherry in the center of each pineapple ring, pressing gently so it stays in place.
- In a medium bowl, whisk together the flour, baking powder, and salt. Set this aside. Make sure all your dry ingredients are measured accurately — too much flour will make the cake dense and heavy.
- In a large bowl, beat the softened butter and granulated sugar together with an electric mixer on medium speed for about 3 minutes until light and fluffy. The mixture should look pale and creamy. Scrape down the sides of the bowl halfway through.
- Add the eggs one at a time to the butter-sugar mixture, beating well after each addition. Mix in the vanilla extract and the 2 tablespoons of reserved pineapple juice. The batter might look slightly curdled — that’s normal and will smooth out once you add the flour.
- Add the flour mixture to the wet ingredients in three additions, alternating with the milk, starting and ending with the flour. Mix on low speed just until combined after each addition — do not overmix or the cake will be tough. The batter should be smooth and thick.
- Pour the batter carefully over the pineapple rings in the skillet, spreading it gently with an offset spatula or the back of a spoon so it’s even. Bake at 350°F for 42-48 minutes, or until a toothpick inserted in the center comes out clean. Let the cake rest in the skillet for exactly 5 minutes, then place a large plate over the skillet and flip it over in one confident motion. Lift the skillet away and let the cake cool for at least 15 minutes before slicing.
Notes
- If any pineapple rings or cherries stick to the skillet after flipping, just peel them off and place them back on the cake — the caramel is forgiving and will hide any imperfections once it settles.
- For a richer flavor, substitute 1 tablespoon of the reserved pineapple juice with dark rum. It adds a subtle warmth that pairs perfectly with the brown sugar caramel.
- Dark brown sugar gives a deeper, more molasses-forward caramel than light brown sugar. Use dark if you have it, but light brown sugar will still produce a great result.